
Hardware
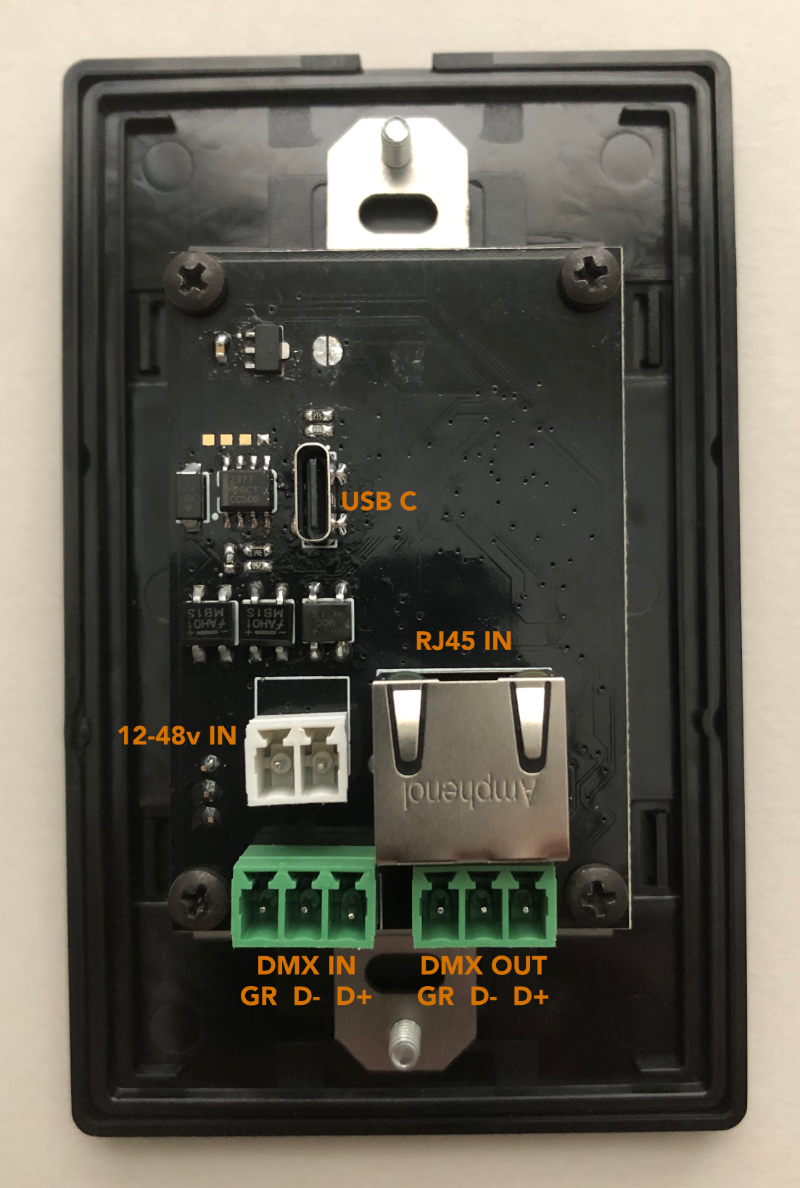
Looking at the back, you will see five connection points on Rosalind Pro:
- USB C - This is a data port only for firmware updates, it can be used to temporarily power the device.
- 12-48v In - This is one of two ways to power the device. The power is polarity-free.
- RJ45 In - Provides access to the web interface for programming and for sACN input and output. The device can also be powered with PoE through this port.
- DMX In - Wire your DMX input here. Pin configuration from left to right is Ground, D- and D+.
- DMX Out - DMX outputs from this phoenix connector. Pin configuration from left to right is Ground, D- and D+.
Connecting Power
Rosalind Pro can be powered in three ways:
Dedicated power supply
A dedicated power supply can be plugged into the 12-48v input. Power supplies do not ship standard with Rosalind Pro, but can be supplied separately. Compatible options include:
- Wire-in power supply (Meanwell APV-8-24)
- Wall-wart power supply (CUI SWI5-12-N-MUB)
PoE power
Rosalind Pro can take both passive and active (i.e., 802.3af) PoE through the RJ45 input.
- Passive PoE must be 48V - Rosalind Pro does not support 24V passive.
- Rosalind Pro classifies as a Class 0 PoE device and will draw the minimum 0.44W at all times.
- Actual power consumption will vary based on the LED brightness.
USB power (not advised)
The USB-C port is used for low-level firmware updates, but can also be used to power the device. However, the power supply filtering for this input is minimal, so we do not recommend using it for any sort of installation or production use.
Connecting Data
For DMX data:
Connect DMX In and Out using the included Phoenix connectors.
For sACN data:
Plug in Ethernet to the RJ45 input.
DMX input and output are enabled by default. If using sACN, you’ll need to enable them in the IO Settings later on!
Connecting Ethernet
If you haven’t already connected Ethernet for power or sACN, connect your Ethernet cable to the RJ45 port now. This will enable programming through Rosalind Pro’s web interface.
Connecting Over your Network
Rosalind Pro has a default IP address of 10.1.0.20 and a subnet mask of 255.255.0.0. To connect:
- Set the IP address and Subnet on your computer to be compatible.
- Once you’ve set your IP, open any browser and enter Rosalind Pro’s IP address in the URL bar to sign into the Web Interface.
An example IP for your computer would be 10.1.0.2 with a subnet mask of 255.255.0.0.

Once you’re connected to the web interface, you’re ready to begin programming!