All of Rosalind Pro’s features can be programmed through RDM tools except for IP address, Subnet, button colors and button labels.

Any RDM tool will work with Rosalind Pro, but each is slightly different. The instructions below are for programming via DMXCat®. If you are using a different RDM tool and run into problems, reach out to us at support@benpeoples.com - we’re happy to help!
Connecting via DMXCat®
Connect your DMXCat® to the DMX In port on the back of the button station. When DMXCat® boots up, choose RDM Controller.
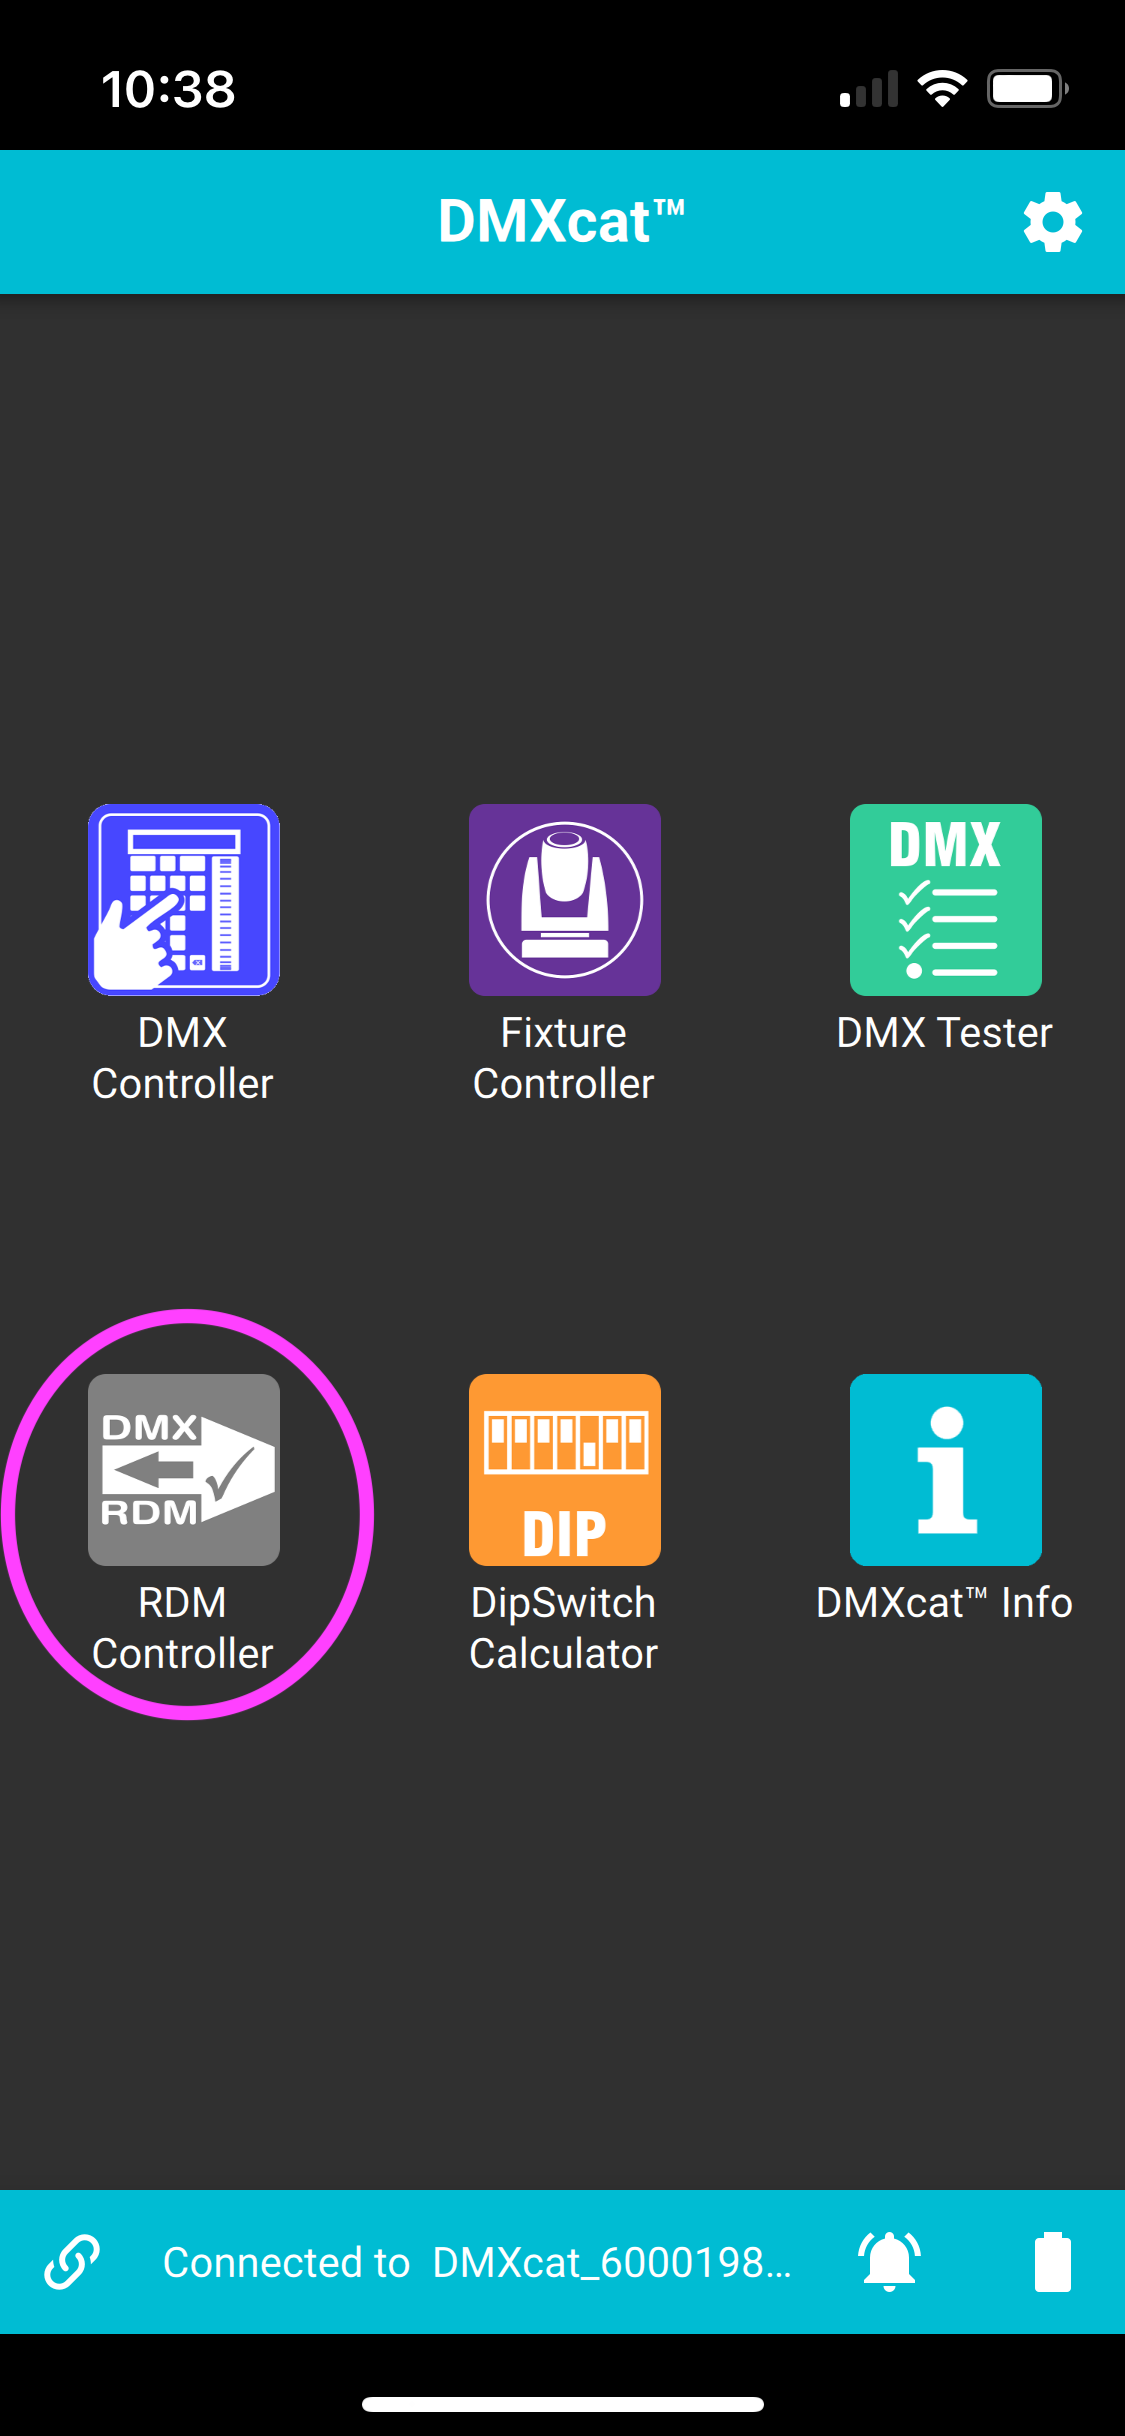
The Rosalind Pro Button Station will be listed. Select the RDM icon.
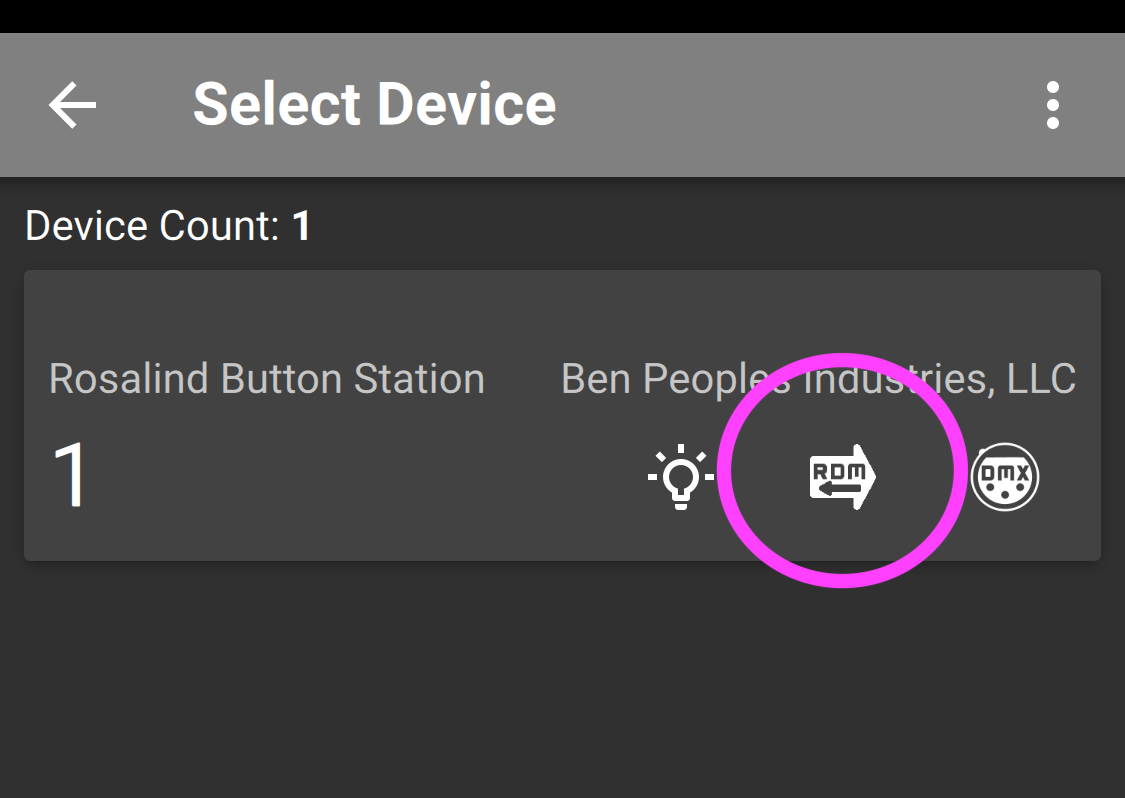
Locating the Settings
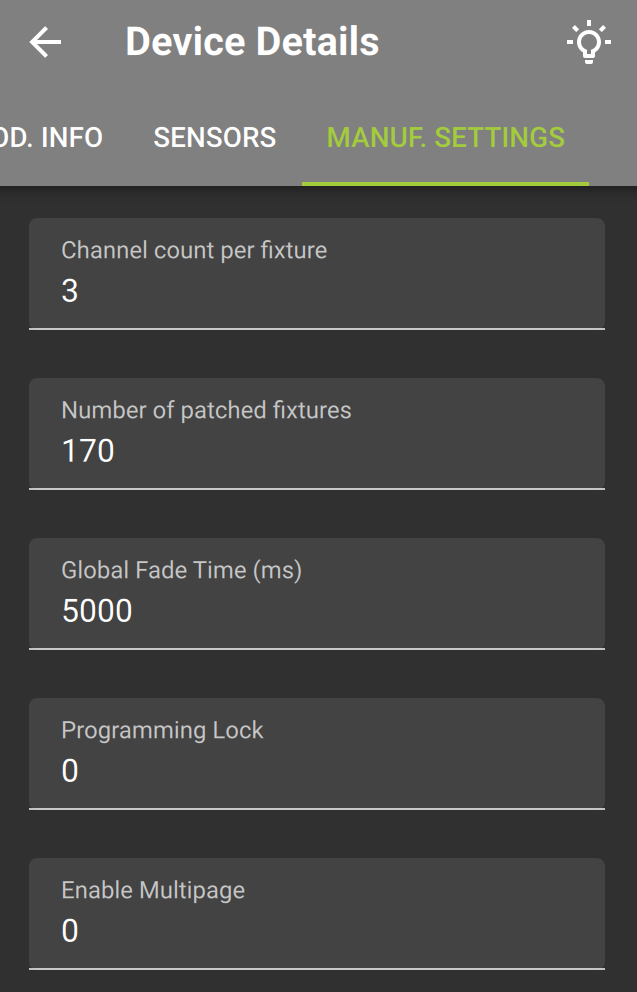
Scroll along the top of the DMXCat® screen to select Manufacturer Settings. Here you’ll find almost all of Rosalind Pro’s programmable features.
Please note that when programming via RDM, each setting must be updated individually. Change the value and press the “play” button to save it.
A few options are only available in the Web Interface. These include:
- IP Address
- Subnet
- Button Color
- Button Label
- Changing and saving settings in bulk
Setting Options
Channel Count Per Fixture
To use the effect presets, Rosalind Pro will need to know how many parameters each fixture takes. An RGB fixture would take three parameters, as an example.
Always adjust Channel Count per Fixture first, and then adjust Number of Patched Fixtures.
Adjusting Number of Patched Fixtures first may result in the controller auto-correcting to a lower number as it attempts to keep you from patching more than one universe of fixtures.
Number of Patched Fixtures
If you are doing an installation with only one kind of fixture (architectural, theme park, etc), Rosalind Pro has five built-in effect presets (Solid, Stripes, Bars, Waves, Roll).
These presets allow you to program 1-6 lights and the controller will map the colors across the whole array. Number of Patched Fixtures is where you set the number of fixtures Rosalind Pro will map across.
The number of fixtures is limited to one universe of DMX (512 channels).
If you are doing an installation with multiple kinds of fixtures, you will most likely want to use snapshots and won’t need the Channel Count or Number of Patched Fixtures settings.
Global Fade Time (ms)
This is the fade time for releasing a preset, in milliseconds.
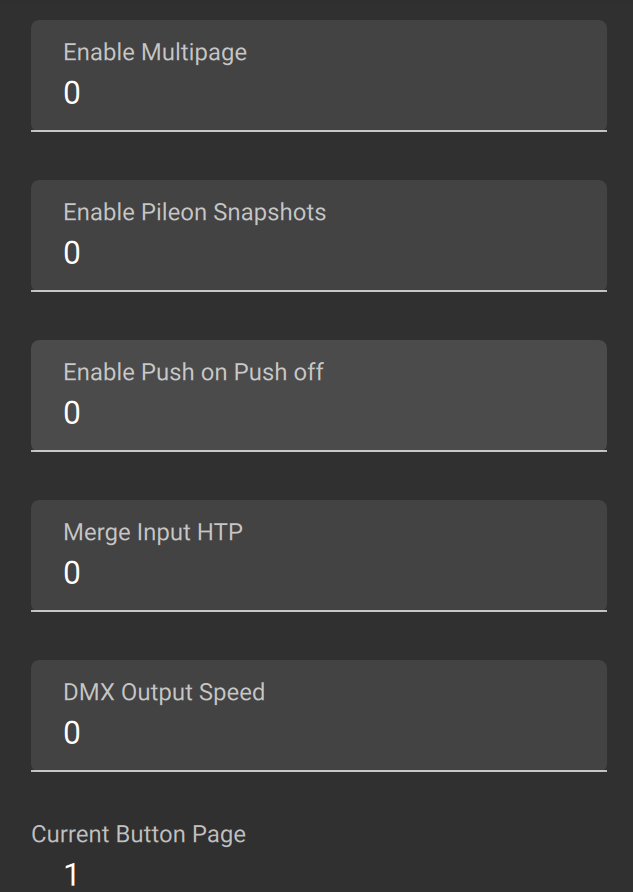
For the following settings, 0=OFF, 1=ON.
Programming Lock
Select this to prevent button station key combinations from enabling programming mode.
Enable Multipage
Rosalind Pro can store up to eight pages of buttons. They are accessible by pressing the 1st and 8th button at the same time, then selecting the page you want. If you don’t want multiple pages, you can turn them off here.
Enable Pile-on Snapshots
By default, presets are exclusive - that is, if Preset 1 is active, pressing Preset 2 will cross fade from Preset 1 to 2.
Pile-on snapshots allow more than one preset to be active, mixing presets in an LTP (Last Takes Precedence) manner, filtering on each DMX address by whether a value is above 0 in that preset. This is primarily useful for zone control that does not overlap in any way, such as the house lighting in an auditorium.
Enable Push-On/Push Off (POPO)
By default, short-pressing an active button has no action - if you want to turn the current preset off, you long press the button and it fades the lights to black.
If POPO mode is enabled, pressing an active button is the same as long pressing the button and will immediately fade the lights out.
Merge Input HTP
If enabled, this merges the input (from copper or sACN) with whatever presets the Rosalind Pro is currently running in an HTP (Highest Takes Precedence) manner.
If not enabled, any DMX or sACN input will completely override the presets the Rosalind Pro is running.
DMX Output Speed
This sets the DMX output speed, per the following table:
0 | Max | 43.5Hz |
1 | Max | 43.5Hz |
2 | Fast | 32.3Hz |
3 | Medium | 18.5Hz |
4 | Slow | 18.5Hz |
Details on the timing are in the Programming via Web Interface section.
Button Options
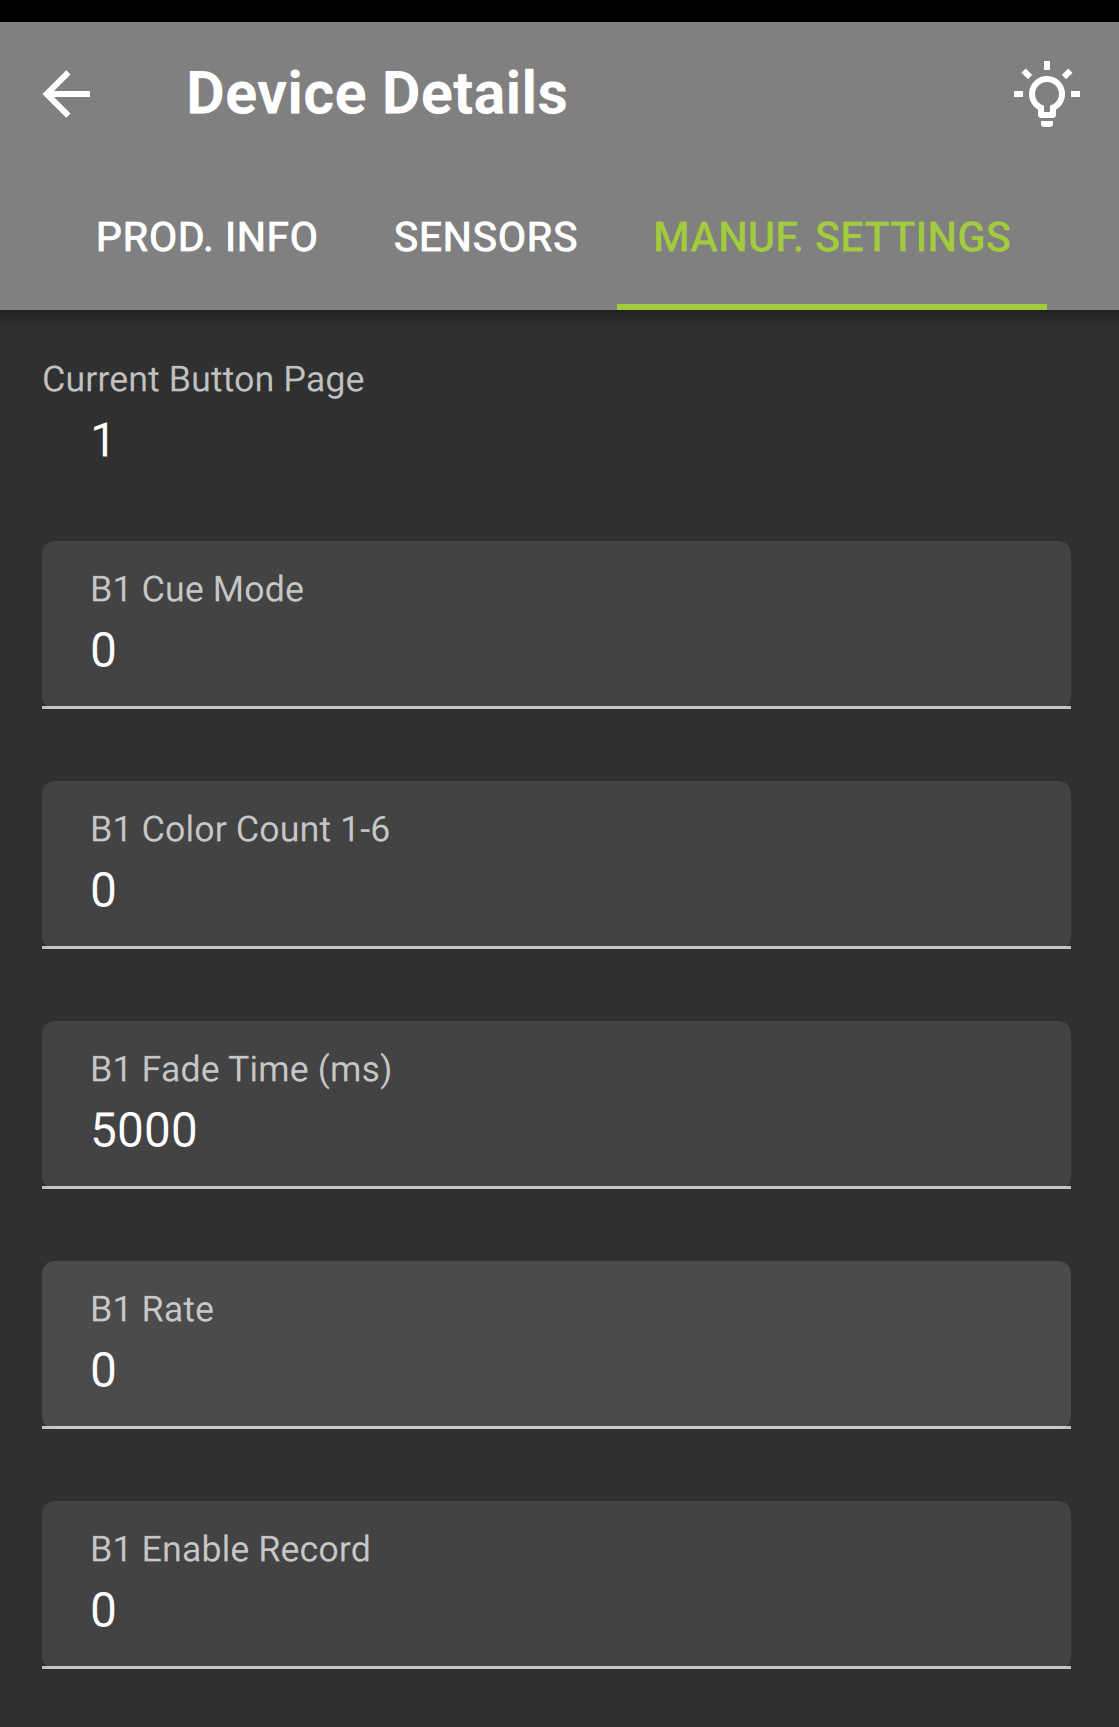
Scrolling down past the Setting Options, you will get to the first Button Options.
Current Button Page
The DMXCat® always displays the button page you are on. If you want to edit another page, press button 1 and 8 at the same time, then select the button number to get to that page and then refresh the RDM Manuf. Settings.
Cue Mode
This field allows you to set the behavior of each button (B1-B8). Buttons can be set to be a Snapshot, one of the preset effects, raise/lower intensity, and more.
See the chart below for numbers and definitions of Cue Mode options.
Color Count 1-6
Choose how many fixtures Rosalind Pro should take information from when creating Stripes, Bars, Waves and Roll Presets.
Rate
This is not always a rate parameter. See the chart below.
Enable Record
Selecting this (and then pressing Save Settings to push to the hardware) will enable recording on the button. The button will blink while in this mode.
Cue Modes and Parameters
ID | Name | Color Count | Fade Time | Rate |
0 | Snapshot | N/A | Sets fade time in ms | N/A |
1 | Solid | N/A | Sets fade time in ms | N/A |
2 | Stripes | 1-6 | Sets fade time in ms | N/A |
3 | Bars | 1-6 | Sets fade time in ms | N/A |
4 | Waves | 1-6 | Sets fade time per each step | Sets the size of color bar across fixtures |
5 | Roll | 1-6 | Sets fade time per color | N/A |
6 | Cellular Automata | 3 (only) | Sets fade time per step | N/A |
7 | Random Walk | 1-6 | Sets fade time per step | N/A |
8 | Ping Pong | 1-6 | Sets fade time per step | N/A |
9 | Raise Intensity | N/A | Sets the fade time for the intensity change | N/A |
10 | Lower Intensity | N/A | Sets the fade time for the intensity change | N/A |
11 | Pile-on Off | N/A | Sets the fade time for the fade out. | N/A |
12 | Off (Stop DMX) | N/A | Sets the fade time for the fade out. | N/A |
Cue Mode Descriptions
Snapshot (0)
Static capture of the whole universe of data.
Solid (1)
Sets all fixtures to the color of the first fixture.
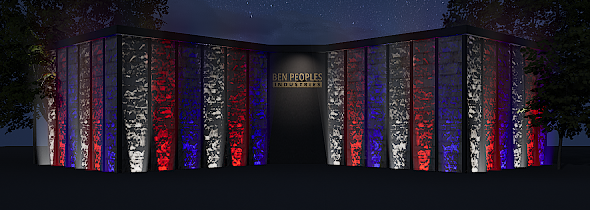
Stripes (2)
Alternates between colors.
- Color count is the number of colors you want, input by the appropriate number of fixtures on recording - one fixture set to each color you want.
This is a three color stripe of white, red and blue:
Bars (3)
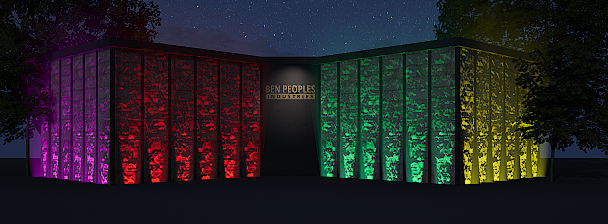
Splits the colors evenly across fixtures. 12 fixtures with 3 colors would be 4 colors wide each.
- Color count is the number of colors you want, input by the appropriate number of fixtures on recording - one fixture set to each color you want.
This is a 4-color Bar effect across 24 fixtures:
Waves (4)
A pile-on wave of color changes that build one fixture at a time.
- Fade time is the the time per step.
- Rate sets the size (number of fixtures) across the fixtures.
- Color count is the number of colors you want, input by the appropriate number of fixtures on recording - one fixture set to each color you want.
This is a 3-color Wave with Red, Green, and Blue. Fade is set to 500ms, Dwell is set to -250ms (Dwell is currently not settable through RDM), and Rate is set to 4.
Roll (5)
All fixtures roll together through up to six color changes.
- Color count is the number of colors you want, input by the appropriate number of fixtures on recording - one fixture set to each color you want.
This is a 3-color Red, Green, Blue roll with the fade time set to 500ms:
Cellular Automata (6)
This is a cellular automata effect generated with three colors.
- Color count is always 3, whether a value is input or not.
Each fixture is in one of three states:
- Color 1 (“Dirt”)
- Color 2 (“Tree”)
- Color 3 (“Fire”)
- Colors are input by the first 3 fixtures on recording - one fixture set to each color you want.
All fixtures start in Dirt (Color 1).
In each step, Dirt has a random chance of turning into a Tree. Tree has a random chance of turning into Fire. If a Tree is adjacent to fire, on its next step it will also turn into fire. Fire then turns to Dirt. This is an example running quite quickly with a pale yellow as Dirt, green as Tree, and red as Fire:
Random Walk (7)
Each fixture picks a different color to fade to in each step.
- Color count is the number of colors you want, input by the appropriate number of fixtures on recording - one fixture set to each color you want.
This is a 3 color random walk where each color is a different blue. Fade is set to 1000ms, Dwell is set to -250ms:
Ping Pong (8)
A wave of color fades down the line of fixtures in one direction. When it reaches the end, it reverses in a new color.
- Color count is the number of colors you want, input by the appropriate number of fixtures on recording - one fixture set to each color you want.
This is a 4-color Ping Pong (Red, Purple, Blue, Green) with Fade set to 500ms and Dwell set to -250ms:
Raise Intensity (9)
Raises the global intensity level if short pressed, or continues to do so the whole time it is long pressed, stopping when released.
If there is no intensity channel, the global intensity level is equally applied to all stored DMX channels.
If the intensity is set to 50% and the stored Red value is 100%, the output Red value will be 50%.
If an intensity channel is defined, that channel is the only one affected by the Raise/Lower Intensity buttons.
Lower Intensity (10)
Lowers the global intensity when short pressed, or continues to do so the whole time it is long pressed, stopping when released. See Raise Intensity (above) for a description of the Global Intensity Value.
Pile-On Off (11)
If in Pile-On mode, this disables all presets and fades all output to 0 - this is essentially a “Global Off” button. If pile-on mode is disabled, this button still fades everything out.
Off (Stop DMX) (12)
This has the same behavior as the Pile-On Off button, but after the value hits 0 it stops transmitting DMX packets.
This can be useful if you need to LTP merge with some other source. Additionally, some devices will go into a low-power standby mode with loss of DMX signal.
Pages
Rosalind has the option for up to 8 pages. If multipage is enabled (off by default), you can select which page to be on by pressing the 1 and 8 buttons simultaneously. The buttons will change to a rainbow array. Press any button to go to that page.
Please note: changes are pushed to Rosalind instantly from DMXCat™️. Once you save a value, it is recorded.
Programming Buttons
Programming through DMXCat® is nearly identical to using a console and the Web Interface.
First, put the button or buttons you want to program into Program Mode by selecting Enable Record for each of those buttons. The buttons will blink to indicate they are ready to be programmed.
Once a button is in record mode, it will stay in record mode until you change pages, the device resets, you turn off program mode, or the cue is recorded. You can put all 8 buttons into record mode and record them one at a time. Setting parameters and recording colors/snapshots are separate phases.
Programming Tips & Tricks
It’s notable that you can change cue modes without having to reprogram— if you record 6 colors into a button and then change that to 4 colors, it’s fine. You can switch between modes and change parameters, etc, without having to re-record the colors.
Additionally, if you just want to see what colors are in a button, you can change the button to a Snapshot cue and it’ll display the recorded fixtures.
Be aware that Rosalind may not output if it sees DMX values on the input, so you should unplug to test the preset.
Programming a Snapshot
- Select Cue Mode 0 (Snapshot).
- Set the Fade Time (in milliseconds).
- Set the lights to be what you want using a console or DMXCat™️
- If not already in Program Mode, select Enable Record for the button you wish to record onto, and press Save Changes. The button will blink.
- Press the button to record.
Programming a Solid Color
- Select Cue Mode 1 (Solid).
- Set the Fade Time (in milliseconds).
- Be sure you have set up the Cue Settings (Number of Fixtures, Channel Count).
- Set the first fixture to the desired color.
- If not already in Program Mode, select Enable Record for the button you wish to record onto, and press Save Changes. The button will blink.
- Press the button to record.
- The preview will display for 30 seconds, showing the color played back on all lights. You can cancel the preview by long pressing the button you just recorded again to dismiss it.
Programming Stripes
- Select Cue Mode 2 (Stripes).
- Set the Fade Time (in milliseconds).
- Be sure you have set up the Cue Settings (Number of Fixtures, Channel Count) as well as DMX In and Out.
- Set Color Count to the number of colors you want.
- Set the first fixtures to your desired colors (ex: set the first 3 lights to your 3 chosen colors).
- If not already in Program Mode, select Enable Record for the button you wish to record onto, and press Save Changes. The button will blink.
- Press the button to record.
- The preview will display for 30 seconds, showing the stripes in your chosen colors played back on all lights. You can cancel the preview by long pressing the button you just recorded again to dismiss it.
Programming Bars
- Select Cue Mode 3 (Bars).
- Set the Fade Time (in milliseconds).
- Be sure you have set up the Cue Settings (Number of Fixtures, Channel Count).
- Set Color Count to the number of colors you want.
- Set the first fixtures to your desired colors (ex: set the first 3 lights to your 3 chosen colors).
- If not already in Program Mode, select Enable Record for the button you wish to record onto, and press Save Changes. The button will blink.
- Press the button to record.
- The preview will display for 30 seconds, showing the bars in your chosen colors played back on all lights. You can cancel the preview by long pressing the button you just recorded again to dismiss it.
Programming Waves
- Select Cue Mode 4 (Waves).
- Set the Fade Time (in milliseconds).
- Be sure you have set up the Cue Settings (Number of Fixtures, Channel Count).
- Set Color Count to the number of colors you want.
- Set the first fixtures to your desired colors (ex: set the first 3 lights to your 3 chosen colors).
- Set Rate to be the number of fixtures you wish the effect to play across at once.
- If not already in Program Mode, select Enable Record for the button you wish to record onto, and press Save Changes. The button will blink.
- Press the button to record.
- The preview will display for 30 seconds, showing the waves in your chosen colors played back on all lights. You can cancel the preview by long pressing the button you just recorded again to dismiss it.
Programming a Roll
- Select Cue Mode 5 (Roll).
- Set the Fade Time (in milliseconds).
- Be sure you have set up the Cue Settings (Number of Fixtures, Channel Count).
- Set Color Count to the number of colors you want.
- Set the first fixtures to your desired colors (ex: set the first 3 lights to your 3 chosen colors).
- If not already in Program Mode, select Enable Record for the button you wish to record onto, and press Save Changes. The button will blink.
- Press the button to record.
- The preview will display for 30 seconds, showing the roll in your chosen colors played back on all lights. You can cancel the preview by long pressing the button you just recorded again to dismiss it.
Programming Cellular Automata
- Select Cue Mode 6 (Cellular Automata).
- Set the Fade Time (in milliseconds).
- Be sure you have set up the Cue Settings (Number of Fixtures, Channel Count).
- Set Color Count to the 3, although it defaults to three even if not set.
- Set the first three fixtures to your desired colors.
- If not already in Program Mode, select Enable Record for the button you wish to record onto, and press Save Changes. The button will blink.
- Press the button to record.
- The preview will display for 30 seconds, showing the effect in your chosen colors played back on all lights. You can cancel the preview by long pressing the button you just recorded again to dismiss it.
Programming Random Walk
- Select Cue Mode 7 (Random Walk).
- Set the Fade Time (in milliseconds).
- Be sure you have set up the Cue Settings (Number of Fixtures, Channel Count).
- Set Color Count to the number of colors you want.
- Set the first fixtures to your desired colors (ex: set the first 3 lights to your 3 chosen colors).
- If not already in Program Mode, select Enable Record for the button you wish to record onto, and press Save Changes. The button will blink.
- Press the button to record.
- The preview will display for 30 seconds, showing the effect in your chosen colors played back on all lights. You can cancel the preview by long pressing the button you just recorded again to dismiss it.
Programming Ping Pong
- Select Cue Mode 8 (Ping Pong).
- Set the Fade Time (in milliseconds).
- Be sure you have set up the Cue Settings (Number of Fixtures, Channel Count).
- Set Color Count to the number of colors you want.
- Set the first fixtures to your desired colors (ex: set the first 3 lights to your 3 chosen colors).
- If not already in Program Mode, select Enable Record for the button you wish to record onto, and press Save Changes. The button will blink.
- Press the button to record.
- The preview will display for 30 seconds, showing the effect in your chosen colors played back on all lights. You can cancel the preview by long pressing the button you just recorded again to dismiss it.

DMXCat® is a registered trademark of City Theatrical, Inc.
