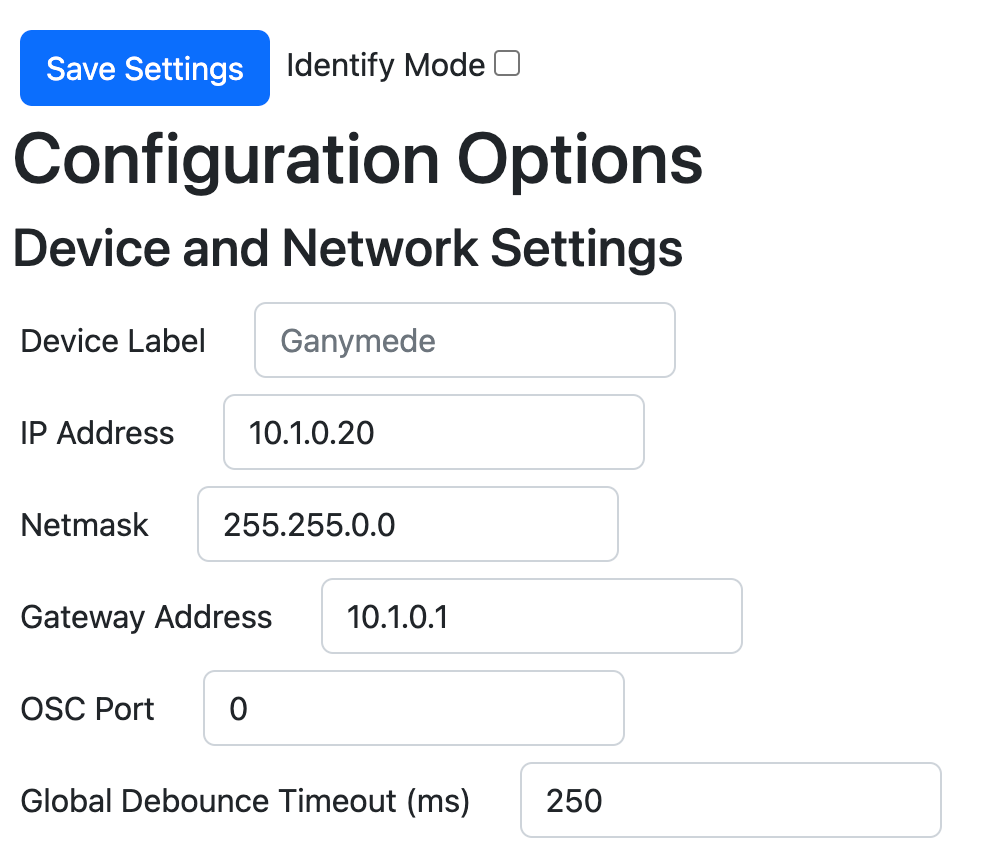
The top of the web interface is dedicated to general configuration options.
General Settings
Save Settings
This button appears at the top and bottom of the Web Interface. Changes are not saved until you press the button.
Identify Mode
Checking this box will cause the device LEDs to flash on and off in a purple color. Unchecking the box will stop this behavior.
This is helpful if you have multiple Ganymedes on a network, to ensure that you are talking to the correct one.

Device Label
You can use this field to label your button station with location or other useful information.
IP Address
This shows the current IP address and allows you to edit the IP address if needed. Be aware that you will need to access the web interface through the new IP address to restore connection after changing the controller’s IP address.
Additionally, if you change the IP address, it will not take effect until you reboot the unit.
Netmask
This should match the subnet settings on your network.
Gateway Address (optional)
This is the address for your default router, if needed.
OSC Port
This port specifies the OSC port for incoming connections to the Ganymede. i.e., QLab defaults to 53000, so you can set that here if necessary. If you are not controlling the Ganymede with external OSC, this number does not matter and can be left blank.
Global Debounce Timeout (ms)
This specifies the minimum amount of time between two button presses. If you press a button twice, it will only fire if there has been at least this much time between presses.
250ms is generally a good number to start with, but you may need it to be higher or lower due to your particular circumstances.
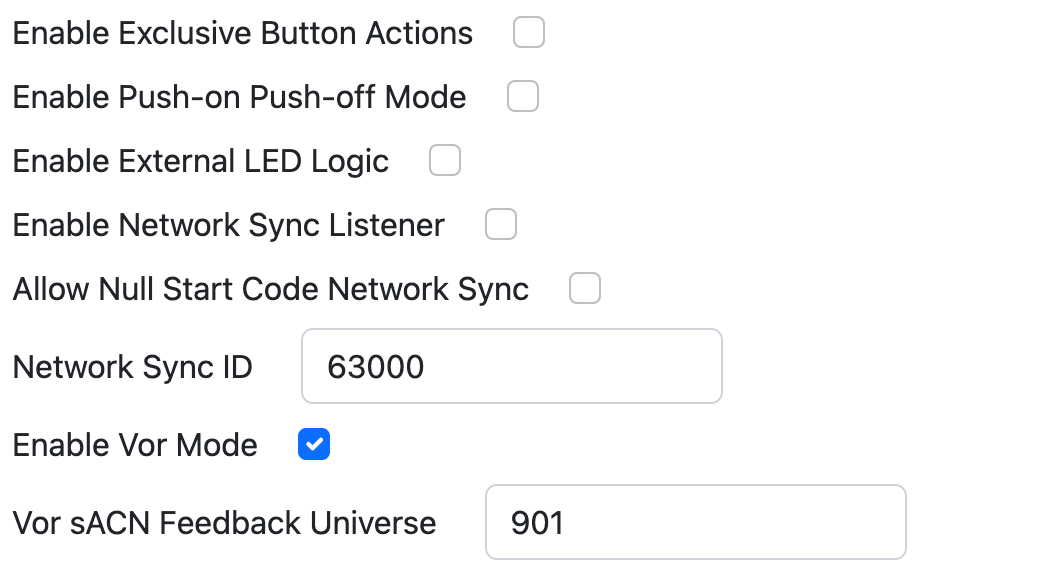
Enable Exclusive Button Actions
By default, any button press deactivates any other button that is pressed.
Un-checking this box allows multiple buttons to be triggered at once or in series.

Enable Push-on Push-off Mode
By default, buttons are selected by short-pressing them. Short-pressing them again (when active) will fire their short-press action again.
If you check Enable Push-on Push-off mode, short pressing an active button will toggle it back to idle and will fire the long-press mode.
Enable External LED Logic
By default, the Ganymede has internal button logic - that is, the LEDs are controlled by the UDP/OSC Button Settings and the behavior of the LEDs is modified by pressing buttons.
However, if you have an external controller that may have multiple control sources, you may want to completely disable the internal LED logic. Checking this box will do that.
Upon boot, the LEDs will be off and will only change state when an external control signal tells them to.
Ganymede Network Sync Settings
Enable Network Sync Listener
When Ganymede is used as a remote station for Rosalind, we want the button states to always stay in sync. The Network Sync Listener does that by listening for special multicast packets from the Rosalind.
Checking this box enables that listener.
Allow Null Start Code Network Sync
Ganymede can also accept sACN packets to control the LEDs. See the DMX chart at right, and note that the start address is fixed (although you can modify the universe).
The 8 independent RGB LEDs each occupy four addresses. The first address is reserved for future use, the remainder are Red, Green and Blue respectively.
Channel | Button LED | Function |
1 | N/A | (Reserved, Send as 0x00) |
2 | N/A | (Reserved, Send as 0x00) |
3 | N/A | (Reserved, Send as 0x00) |
4 | 1 | (Reserved, Send as 0x00) |
5 | 1 | Red |
6 | 1 | Green |
7 | 1 | Blue |
8 | 2 | (Reserved, Send as 0x00) |
9 | 2 | Red |
10 | 2 | Green |
11 | 2 | Blue |
12 | 3 | (Reserved, Send as 0x00) |
13 | 3 | Red |
14 | 3 | Green |
15 | 3 | Blue |
16 | 4 | (Reserved, Send as 0x00) |
17 | 4 | Red |
18 | 4 | Green |
19 | 4 | Blue |
20 | 5 | (Reserved, Send as 0x00) |
21 | 5 | Red |
22 | 5 | Green |
23 | 5 | Blue |
24 | 6 | (Reserved, Send as 0x00) |
25 | 6 | Red |
26 | 6 | Green |
27 | 6 | Blue |
28 | 7 | (Reserved, Send as 0x00) |
29 | 7 | Red |
30 | 7 | Green |
31 | 7 | Blue |
32 | 8 | (Reserved, Send as 0x00) |
33 | 8 | Red |
34 | 8 | Green |
35 | 8 | Blue |
Network Sync ID
This is the sACN universe that this button station will listen to to receive network sync commands.
It can overlap with other universes if you are not allowing Null Start Code data, but if you are, it is best to put it on its own universe.
Vor Settings
Enable Vor Mode
Vor is an application developed by Borealis Solutions.
If you are using Ganymede to control Vor, it can handle some custom LED logic based on Vor’s sACN feedback about state.
Checking this box enables that custom LED logic.
Vor sACN Feedback Universe
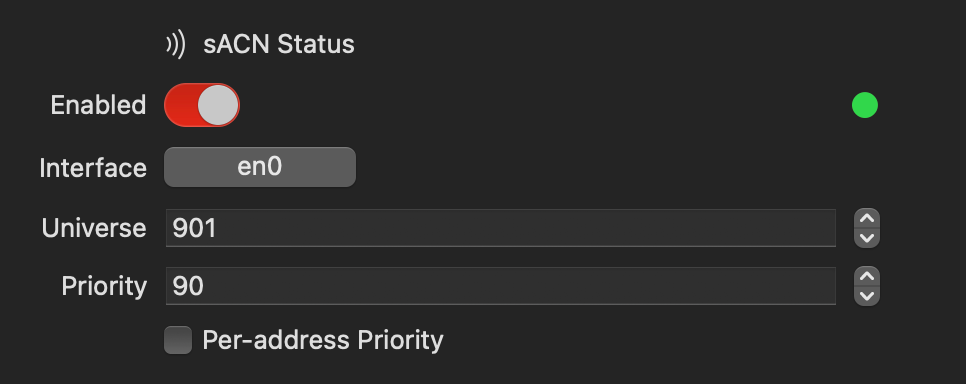
Set this to the same universe you’ve set in Vor.

Vor Mode Notes
When Vor Mode is enabled, it creates two special kinds of buttons. These buttons relate to recording mode and snapshot mode.
A button whose short press or turn-on string starts with
/vor/ and contains any of these substrings is a recording button:/record/start
/record/stop
/record/toggle
A button whose short press or turn-on string starts with
/vor/ and contains /record/snapshot is a snapshot button.Recording Button Behavior
If no data is being received on the Vor sACN Feedback Universe, or address 001 is 0, a recording button will be off.
If address 001 is equal to 1, the recording button will be in the idle color.
If address 001 is anything else, the recording button will be in the active color, with the brightness controlled by the value of address 001.
The result of this is three states:
- Button off: Vor is not active.
- Button in idle color: Vor is active, but not recording
- Button pulsing: Vor is actively recording
Snapshot Button Behavior
If no data is being received on the Vor sACN Feedback Universe, or address 001 is 0, a snapshot button will be off.
If address 002 is equal to 0, the snapshot button will be in the idle color.
If address 002 is anything else, the snapshot button will be in the active color, with the brightness controlled by the value of address 002.
The result of this is three states:
- Button off: Vor is not active.
- Button in idle color: Vor is not currently taking a snapshot.
- Button in active color: Vor is actively taking a snapshot - visual confirmation that the snapshot command worked.
