
Configuration Options
The top of the web interface is dedicated to general configuration options.
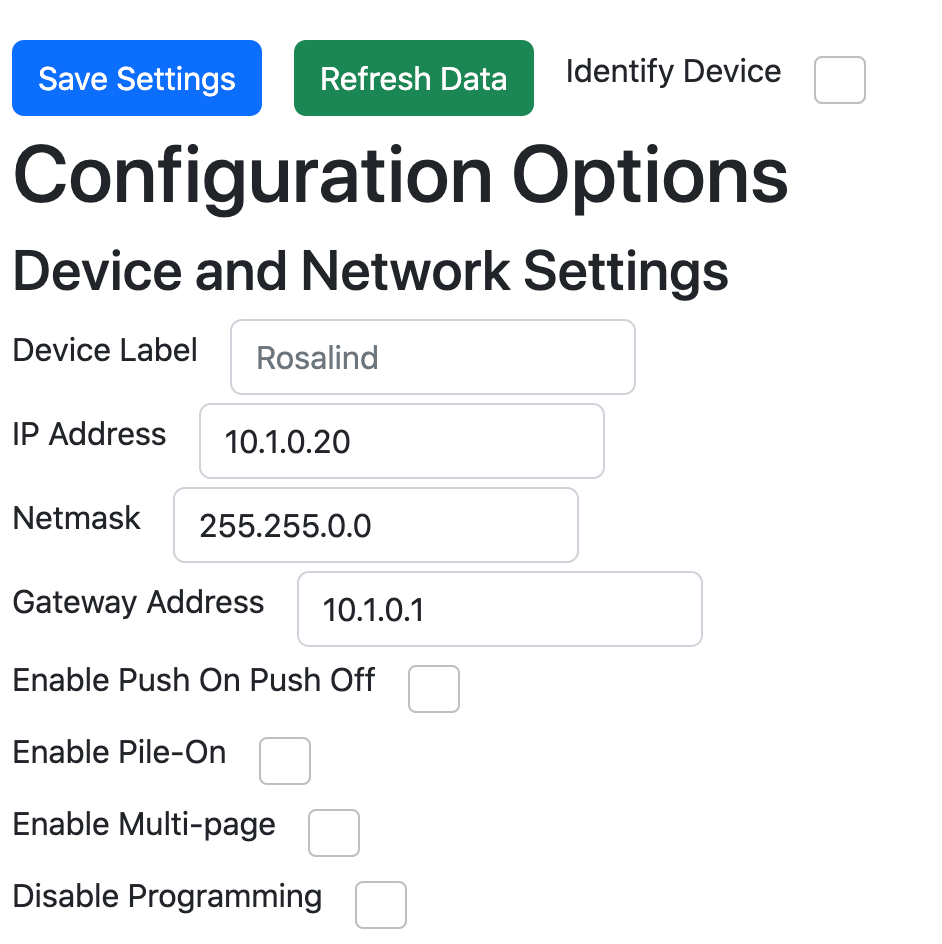
Save Settings- appears at the top and bottom of the Web Interface. Changes are not saved until you press this button.
Refresh Data- imports all the data that is already programmed into the device, this will overwrite any data not yet saved in the web interface.
Identify Device- When selected, this flashes all the buttons on your Rosalind purple. Very helpful when you have more than one button station on your network.
Device Label- a field you can populate with anything helpful to remember where the button station is.
IP Address- Shows the current IP address. This is where you would edit the IP address if needed. Be aware you will need to reconfigure your computer to restore connection after changing IP address.
Netmask- This defines the size of the subnet the Rosalind uses. It should match whatever your network settings are.
Gateway Address- address for your default router, if needed.
Enable Push on Push off- POPO mode changes the button behavior from its default. By default, pressing an active button has no action. If you want to turn the current preset off, you long press the button and it fades the lights to black. In POPO mode, pressing an active button is the same as long pressing the button, it immediately fades the lights out.
Enable Pile-on Mode- By default, presets are exclusive. That is, if Preset 1 is active, pressing Preset 2 will cross fade from Preset 1 to Preset 2. When Pile-on Mode is active, each Preset is mixed in an LTP (Last Takes Precedence) manner, filtering on each DMX address by whether or not the address is above 0 in this Preset. Primarily this is useful if the controller is a zone controller— that is, each button controls a separate zone of the room that you want to turn on and off separately.
Enable Multi-page- Rosalind is able to have up to eight pages of buttons. They are accessible by pressing the 1st and 8th button at the same time, then selecting the page you want. If you didn’t want multiple pages, you would turn them off here.
Disable Programming- this disables the button station from entering programming mode. Primarily this prevents the multi-press key combination from placing the station in program mode.
IO Settings
The next section deals with how input and output is handled in the device:
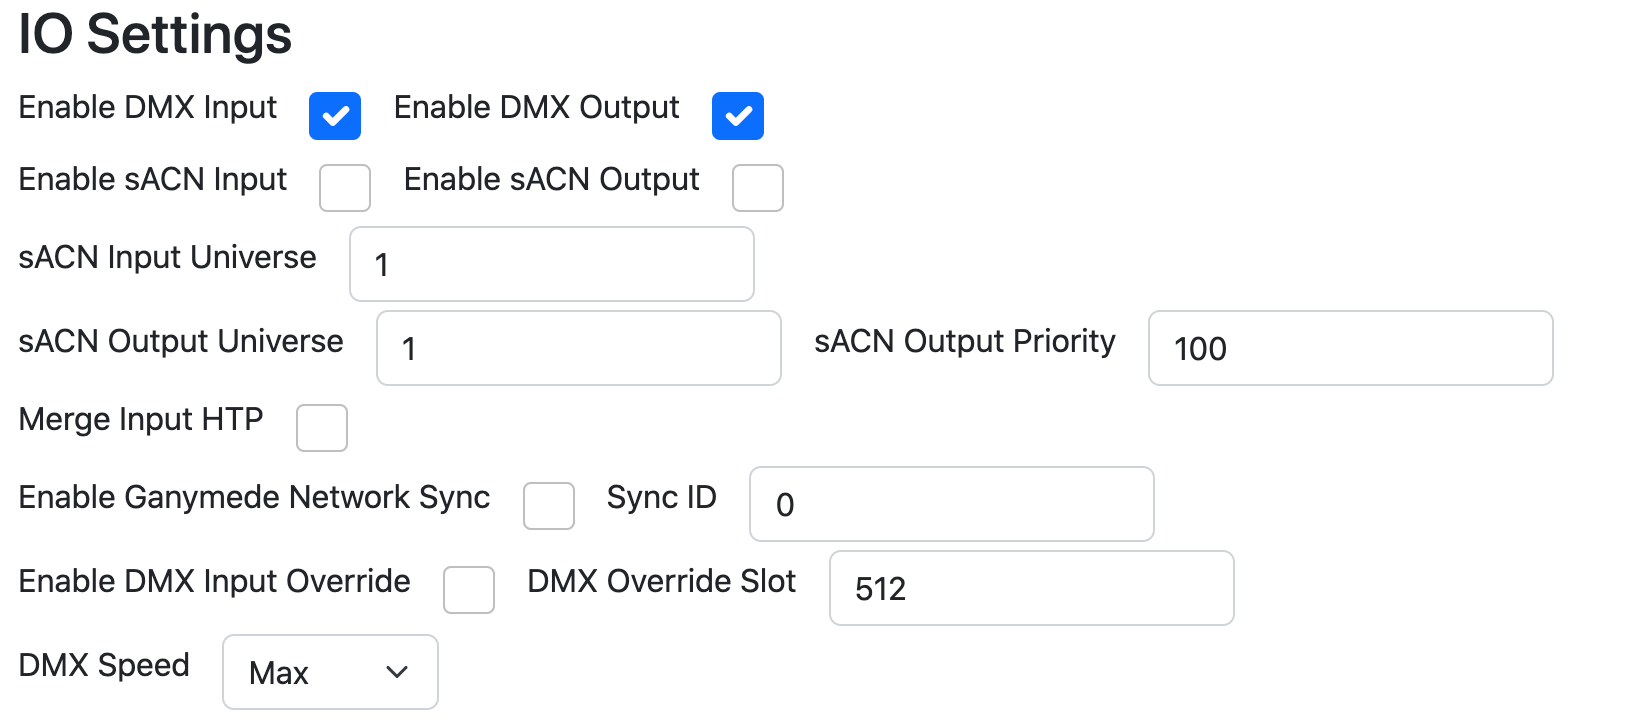
Enable DMX Input: When checked, copper DMX input is accepted. Note that disabling this does not disable the RDM interface, only the DMX input logic.
Enable DMX Output: When checked, DMX is output from the DMX output port.
Enable sACN Input: When checked, sACN is accepted the same as if it had come in on the DMX port. If both the sACN Input and DMX Input are checked, the last packet to be received from either is what’s used. So if both sACN Input and DMX Input are live, the output will randomly switch back and forth between them.
Enable sACN Output: When checked, sACN is output at the set universe and priority. This output is identical to what is otherwise output from the DMX output port.
sACN Input Universe: This sets which universe to accept for sACN Input.
sACN Output Universe: This sets which universe to output for sACN Output.
sACN Output Priority: This sets the output priority from 0-200 for the sACN Output Universe.
Merge Input HTP: If checked, this merges the input (from copper or sACN) with whatever presets the Rosalind is currently running in an HTP (Highest Takes Precedence) manner. If unchecked, any DMX or sACN input will completely override the presets the Rosalind is running.
Enable Ganymede Network Sync: If you are using Ganymede Button Stations as auxiliary buttons, GNS will synchronize the LED state of the button station with those button stations. All devices must have GNS enabled and the same Sync ID and must be located on a network that can route multicast data between the Rosalind and the Ganymede Button Stations.
Sync ID: This is the Sync ID for the Ganymede Network Sync, it can be any valid sACN universe ID.
Enable DMX Input Override: When checked, the value of a single input slot is used to determine if the Rosalind should be overridden by the input data. If that input slot is 0, the Rosalind will run its own presets, ignoring the input universe. If that input slot is above 0, the Rosalind will pass through the DMX data and ignore its own presets.
DMX Override Slot: This sets which slot (1-512) to be used to determine whether to override the input.
DMX Speed: This allows you to reduce the output speed of the DMX updates:
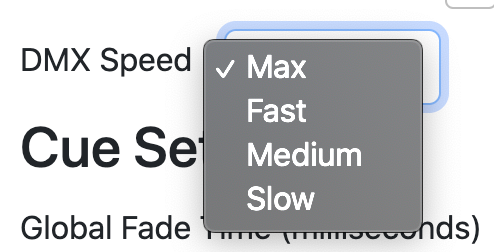
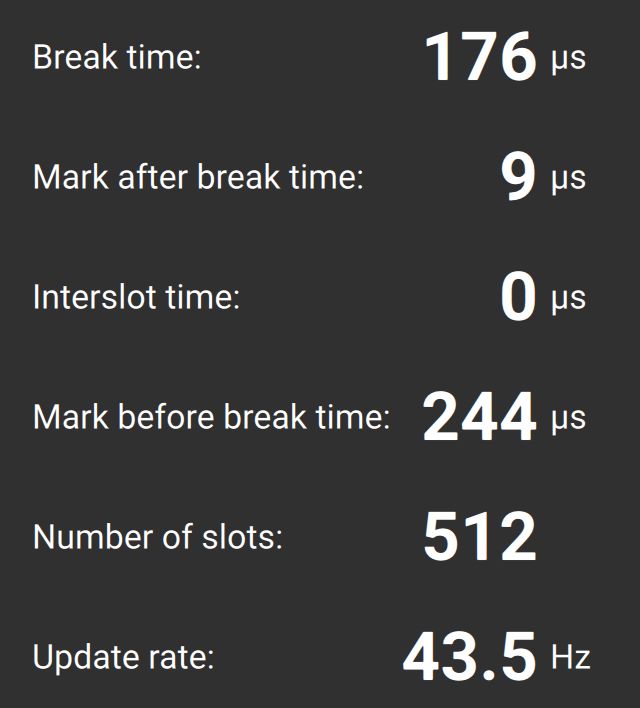
Max is currently this timing:
Fast is this timing:
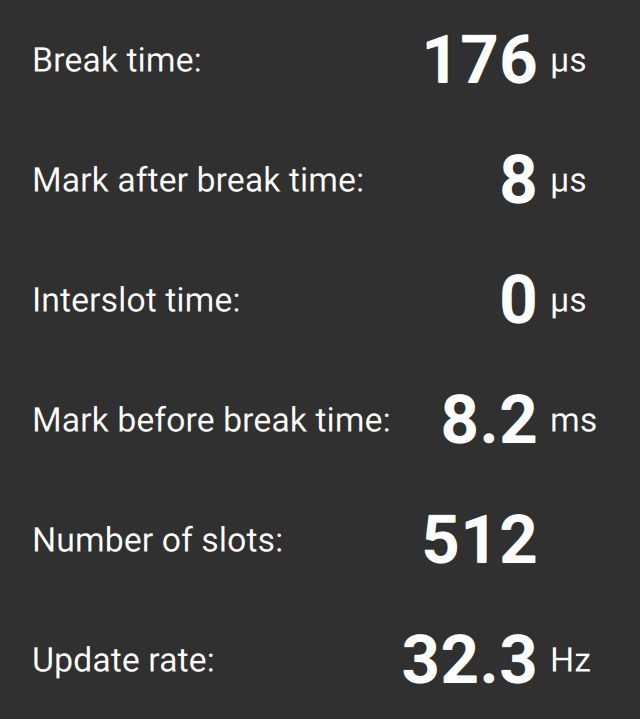
And Medium is this timing:
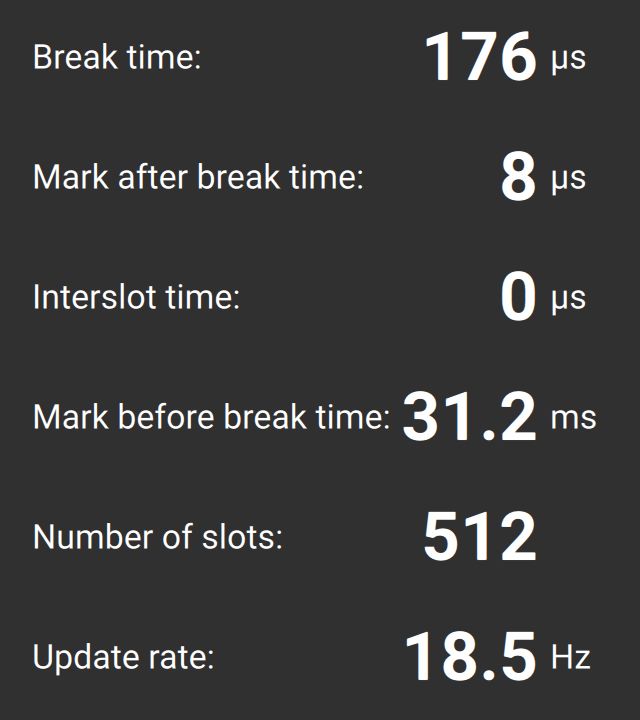
At the moment, Slow is the same as Medium, but will be revised in a firmware update to introduce Interslot time delays. So we recommend using Medium instead of Slow right now to support future compatibility.
Cue Settings
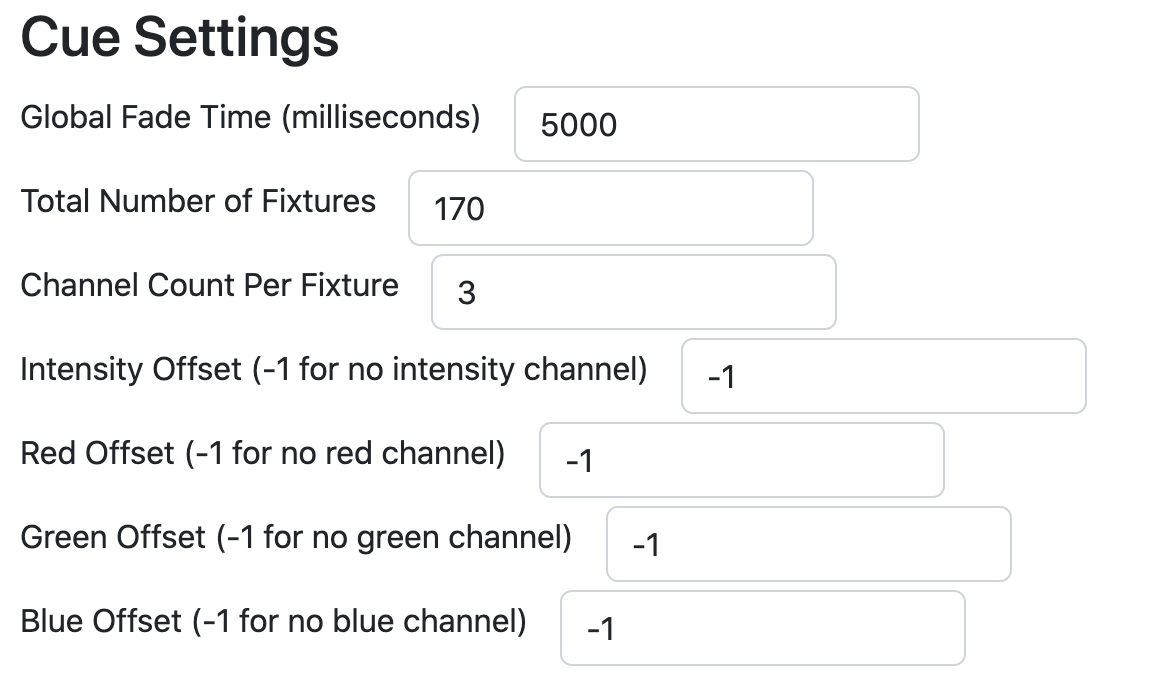
Global Fade Time (milliseconds) is the fade time for releasing a preset.
The remaining options are for doing effect cues, as we need to know how the fixtures are laid out.
Total Number of Fixtures- if you are doing an installation with only one kind of fixture (architectural, theme park, etc), Rosalind is capable of doing effect presets (Solid, Stripes, Bars, Waves, Roll). This is a convenience so you can program 1-6 lights and Rosalind will map the colors across the whole array. This is where you declare the number of fixtures Rosalind will map across.
Channel Count Per Fixture- To use the effect presets, Rosalind will also need to know how many parameters each fixture takes. RGB would take three parameters, as an example.
Offsets
Offsets define the channel layout so we can use the Web Programmer to set colors, etc. You’ll need to refer to the fixture manual to determine these offsets. For a simple RGB fixture, we might have this DMX chart:
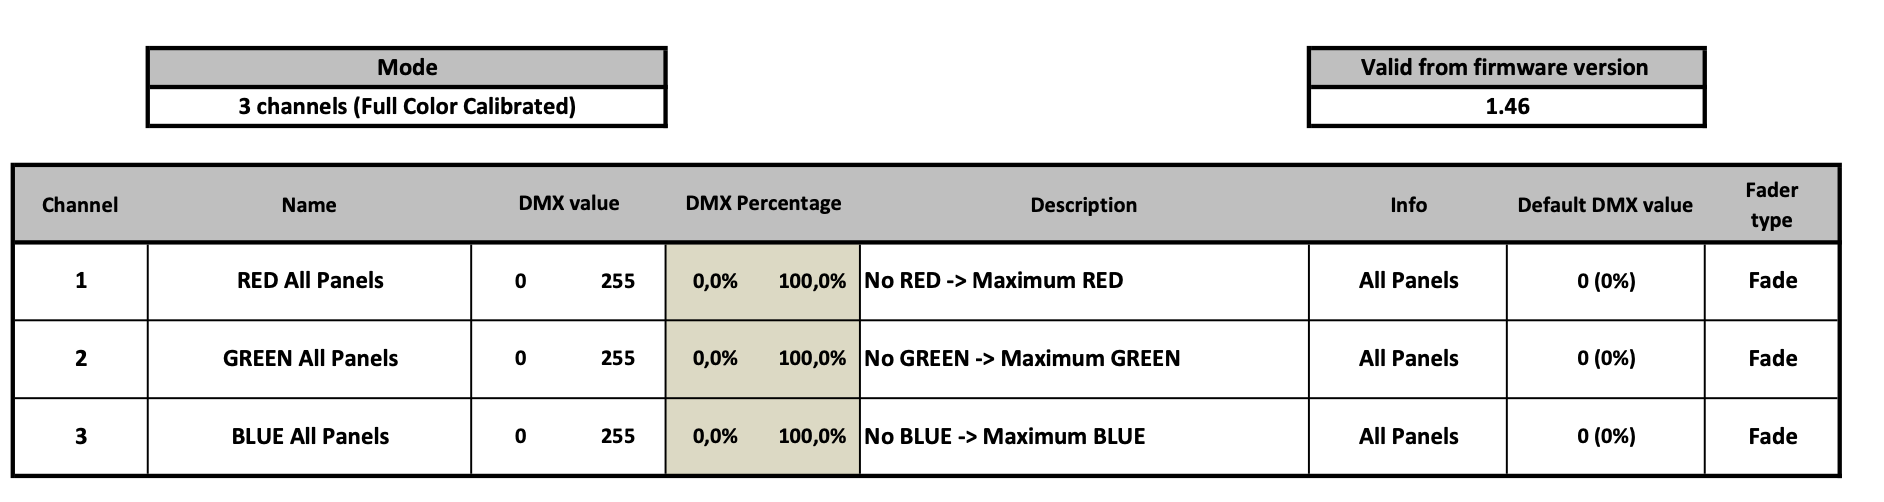
For this, we would set Channel Count Per Fixture to 3, and then set the other offsets as follows:
Intensity Offset | -1 |
Red Offset | 0 |
Green Offset | 1 |
Blue Offset | 2 |
Because these are set as offsets from the start address, we use 1 less than the Channel number indicated in the chart. The Start Address of the fixture is equal to the Red Channel, so the offset is 0.
For a more complicated fixture, we can still program that using the web programmer:
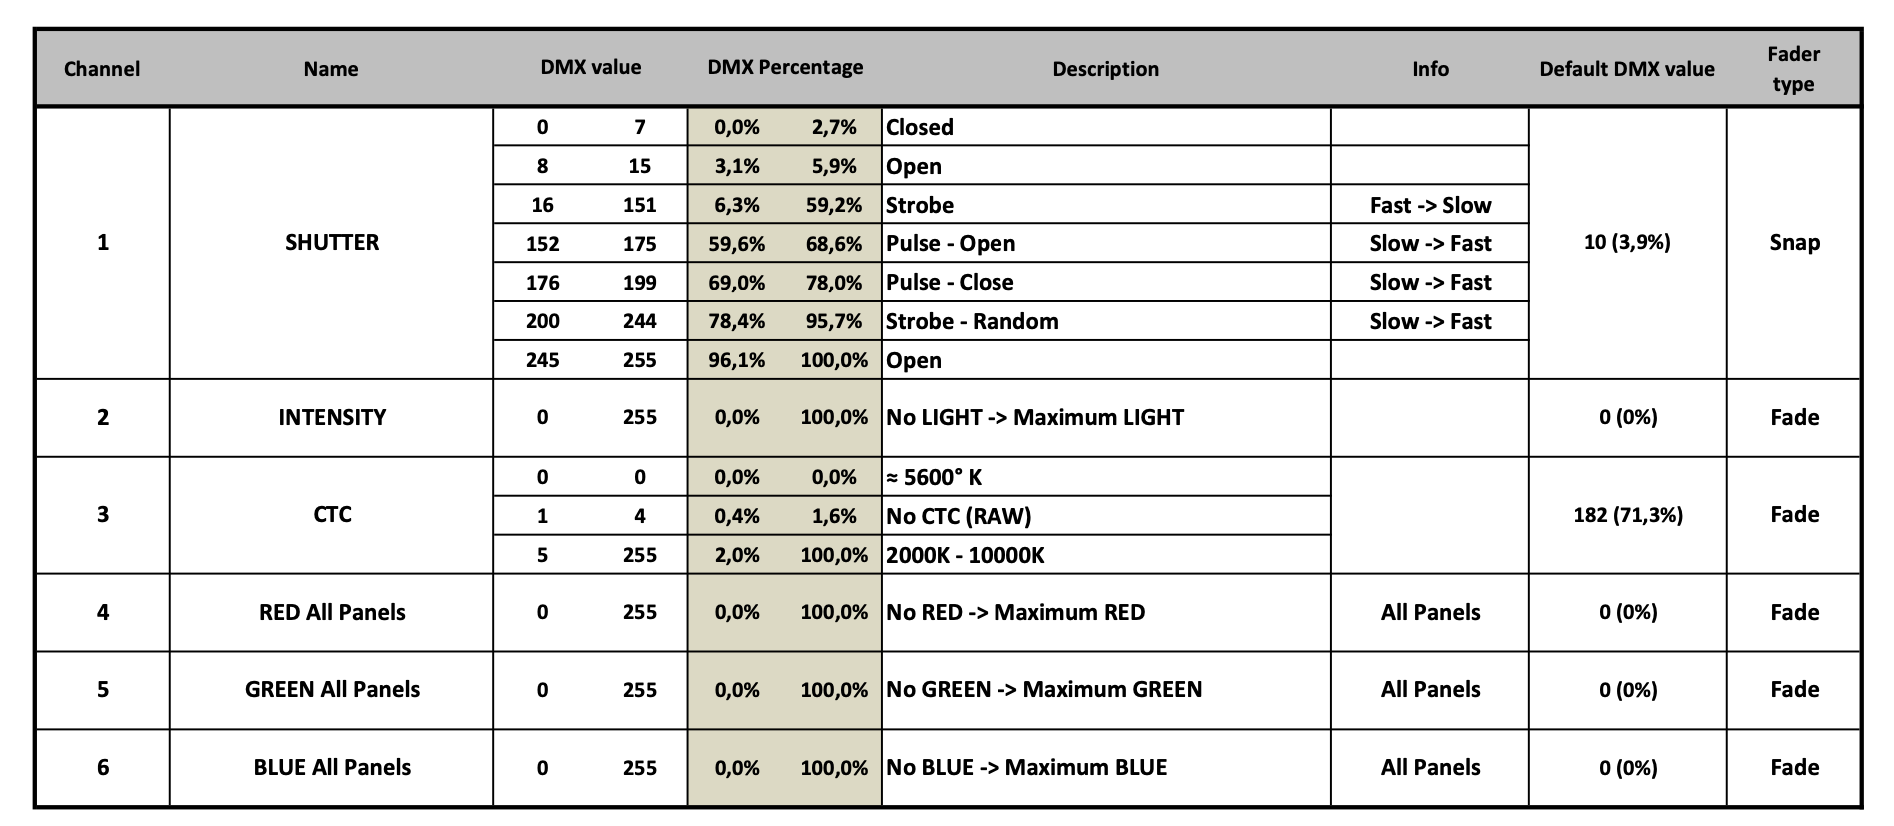
In this case, we would set the Channels Per Fixture to be 6, and then set the offsets as follows:
Intensity Offset | 1 |
Red Offset | 3 |
Green Offset | 4 |
Blue Offset | 5 |
Again, because these are offsets, they are one less than the value of the Channel in the DMX chart. Using DMX Snapshots, all of these parameters can be stored, but by setting these offsets we can use the web programmer (detailed below) to directly program arrays of fixtures.
Buttons
All the buttons on Rosalind can have custom colors. Here you could apply unified color choices to the page of buttons you are currently editing.
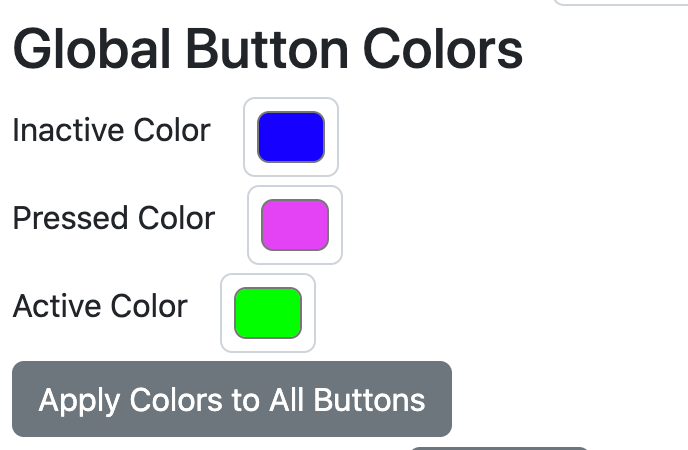
Inactive Color- the button color when the preset isn’t activated.
Pressed Color- the color the button shifts to when pressed.
Active Color- the button color when the preset is active.
Apply Colors to All Buttons- applies your color choices to all buttons on the current page. These are not saved automatically, so please remember to press the Save Settings button when you have finished your changes.
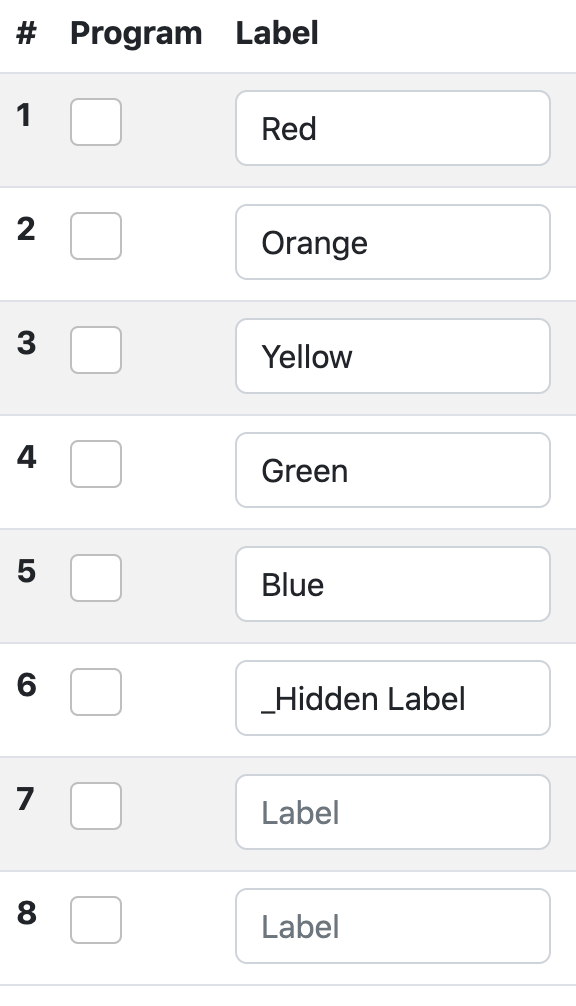
Button Settings
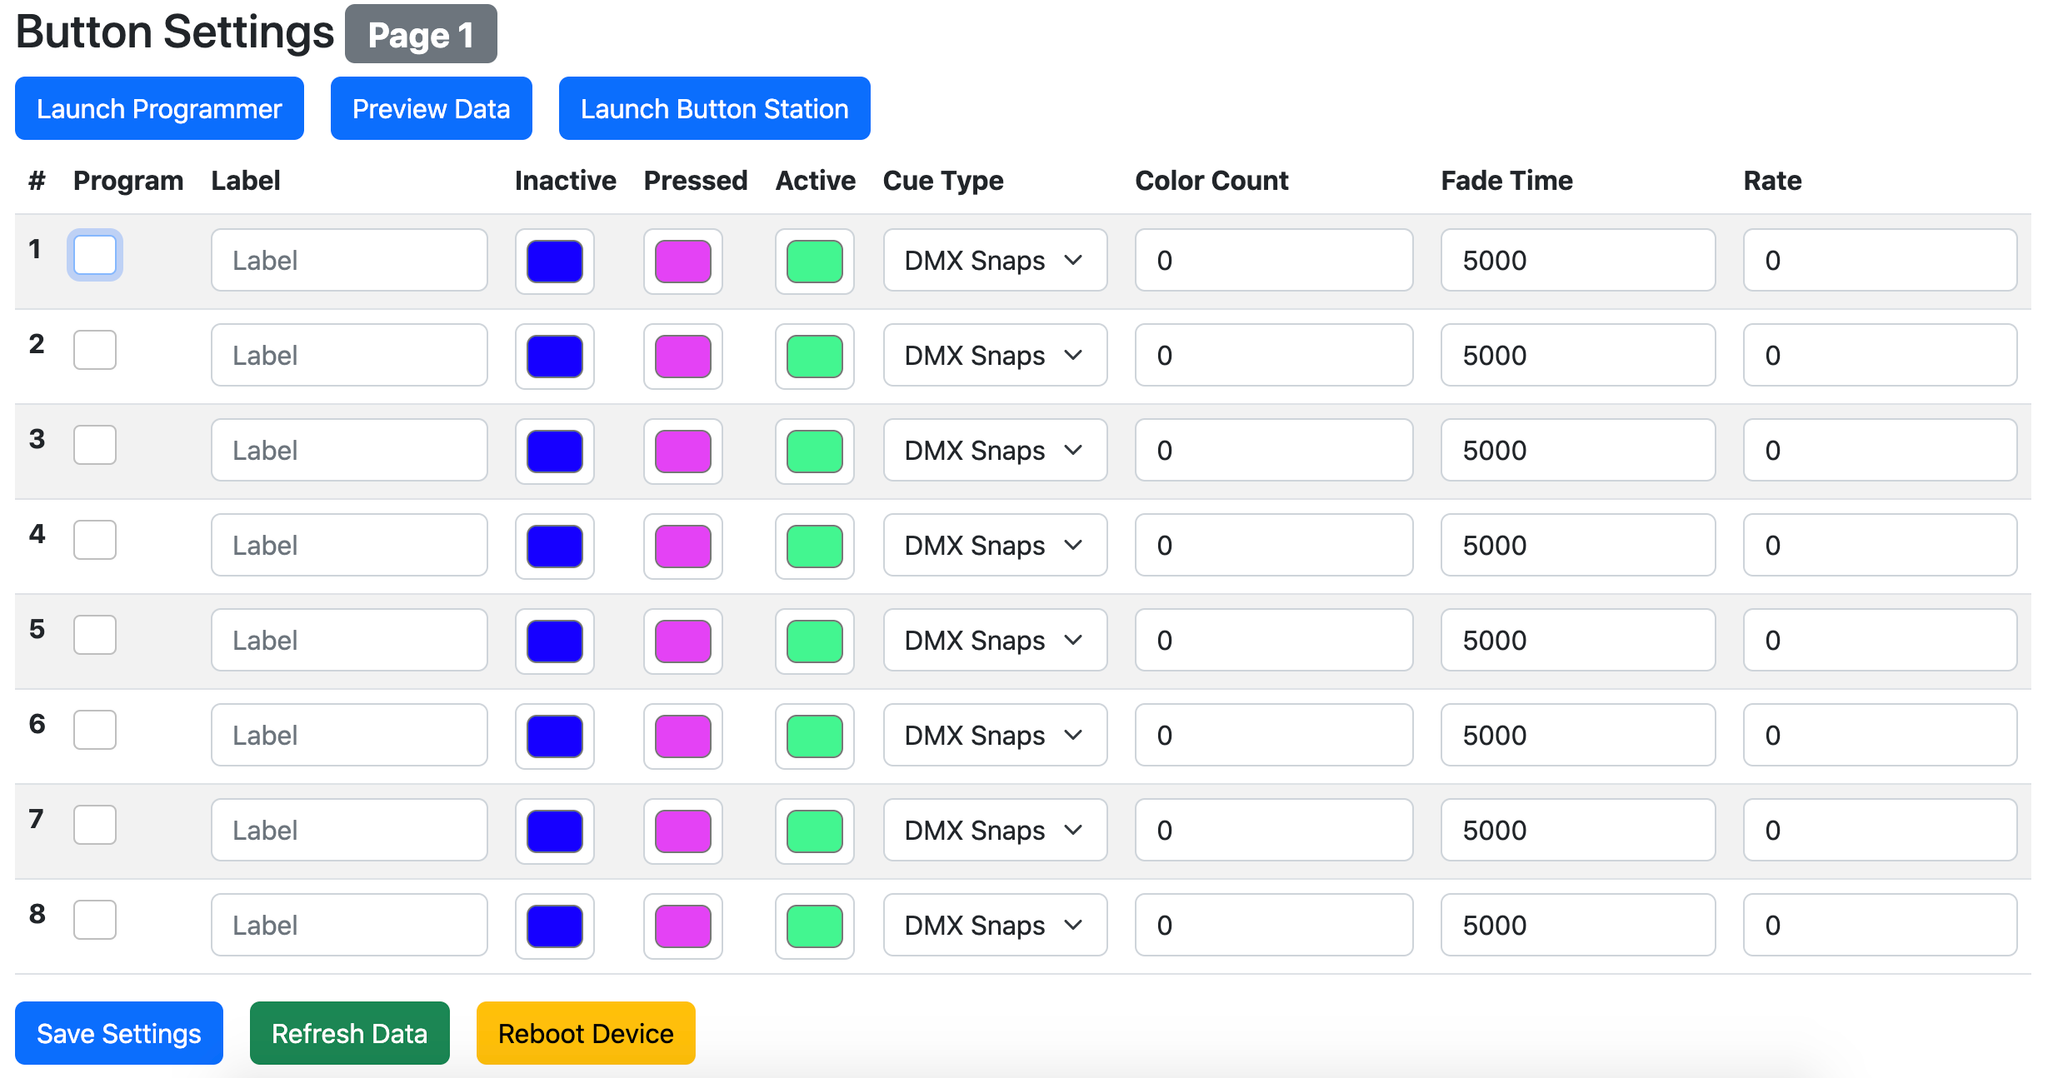
The page always displays the page you are on. If you want to edit another page, press button 1 and 8 at the same time, then selecting the button number to get to that page, and then press the Refresh Data button to load the settings into the web interface.
Program- Selecting this (and then pressing Save Settings to push to the hardware) will enable recording on the button. The button will blink while in this mode.
Label- Text label for the button, maximum of 32 characters.
Inactive, Pressed, Active- color choices for each button and each state for the button.
Cue Types and Parameters
ID | Name | Color Count | Fade Time | Rate |
0 | Snapshot | N/A | Sets fade time in ms | N/A |
1 | Solid | N/A | Sets fade time in ms | N/A |
2 | Stripes | 1-6 | Sets fade time in ms | N/A |
3 | Bars | 1-6 | Sets fade time in ms | N/A |
4 | Waves | 1-6 | Sets fade time per each step | Sets the size of color bar across fixtures |
5 | Roll | 1-6 | Sets fade time per color | N/A |
Snapshot- static capture of the whole universe of data.
Solid- Sets all fixtures to the color of the first fixture.
Stripes- Alternate between colors. Color count is number of colors you want, input by the appropriate number of fixtures on recording- one fixture set to each color you want.
Bars- Splits the colors evenly across fixtures. 12 fixtures with 3 colors would be 4 colors wide each. Color count is number of colors you want, input by the appropriate number of fixtures on recording- one fixture set to each color you want.
Waves- a pile-on wave of color changes that build one fixture at a time. Fade time is the the time per step. Rate sets the size (number of fixtures) across the fixtures. Color count is number of colors you want, input by the appropriate number of fixtures on recording- one fixture set to each color you want.
Roll- all fixtures rolling together through up to six color changes. Color count is number of colors you want, input by the appropriate number of fixtures on recording- one fixture set to each color you want.
Raise Intensity - Raises the global intensity level if short pressed, continues to do so the whole time it is long pressed, stopping when released. If there is no intensity channel, the global intensity level is equally applied to all stored DMX channels. If the intensity is set to 50% and the stored Red value is 100%, the output Red value will be 50%. If an intensity channel is defined, that channel is the only one affected by the Raise/Lower Intensity buttons.
Lower Intensity - Lowers the global intensity when short pressed, continues to do so the whole time it is long pressed, stopping when released. See Raise Intensity for a description of the Global Intensity Value.
Pile-on Off - If in Pile-On mode, this disables all presets and fades all output to 0. A “Global off” button. If pile-on mode is disabled, this button still fades everything out.
Off (Stop DMX) - Has the same behavior as the Pile-on Off button, but after the value hits 0 it stops transmitting DMX packets. This can be useful if you need to LTP merge with some other source. Additionally, some devices will go into a low-power standby mode with loss of DMX signal.
Pages
Rosalind has the option for up to 8 pages. If multipage is enable (off by default), you can select which page to be on by pressing the 1 and 8 buttons simultaneously. The buttons will change to a rainbow array (with white and pink as the last two buttons). Press any button to go to that page.
Save Settings
Each time you press Save Settings, all data is pushed to Rosalind. Don’t forget this step!
Web Programmer
Pressing the Launch Programmer button will launch an in-browser programmer that can be used to set presets on any of the 64 buttons without needing an external DMX source:
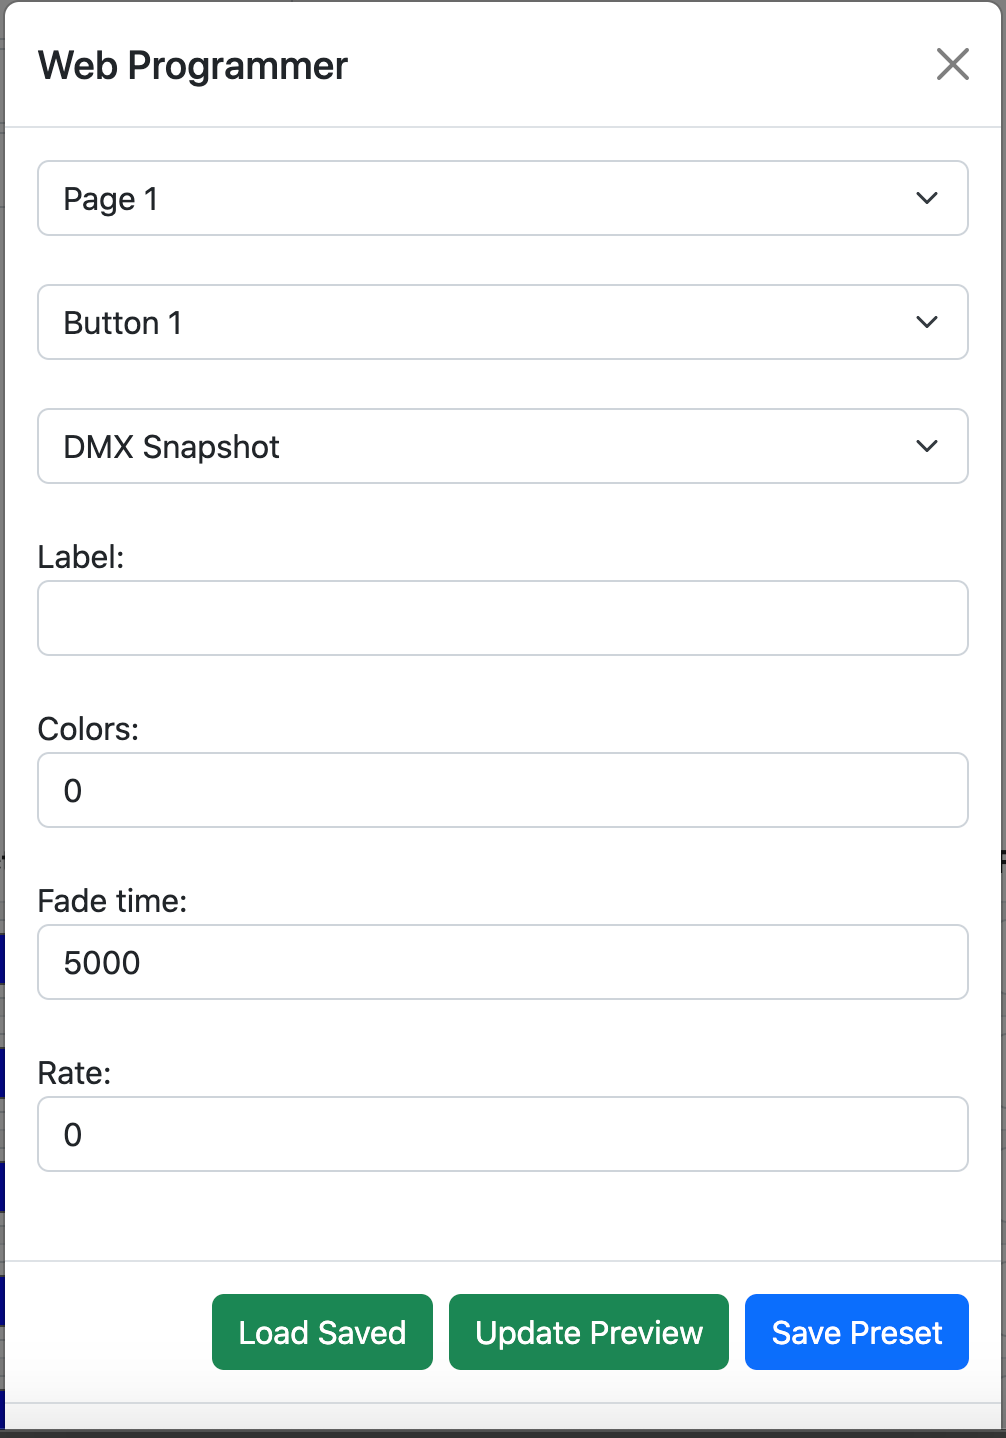
The top two dropdowns define which page and button to program.
The next drop down is what preset mode to program in.
Label allows you assign a friendly label to this preset.
Colors is a count from 0 to 6 defining how many colors are in this preset.
Fade time is the fade-in time in milliseconds.
Rate is used in certain effects.
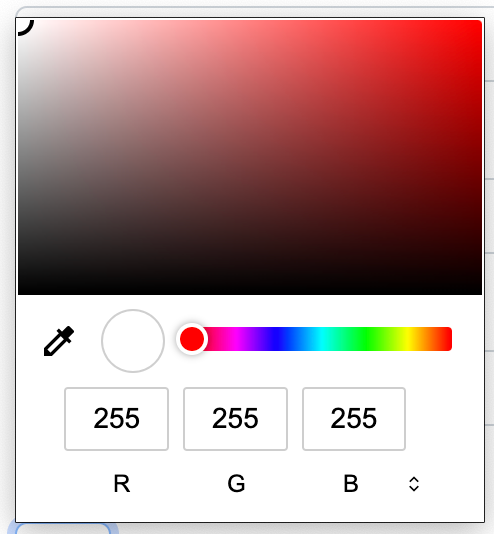
When colors is set to something other than 0, you will get an array of color pickers:
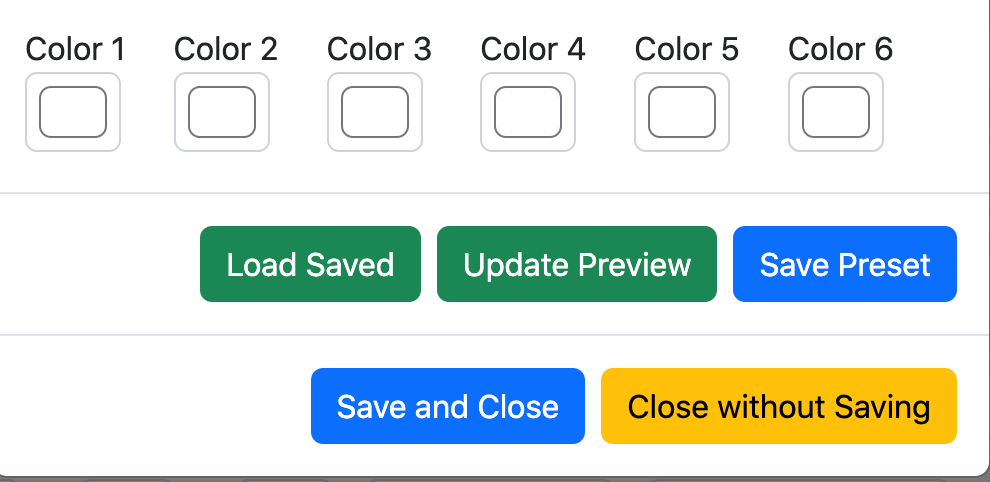
These are RGB color pickers, and the design of them will actually vary based on what browser you are using. This is what they look like on Chrome on Mac:
Once you set your parameters and pick your colors, you can either press the Save Preset button, which will save this preset to the controller, or the Update Preview button. Update Preview will display the cue temporarily on the Rosalind’s output. Once you are happy with your settings, you can press the Save Preset button to actually record it. Additionally, Save and Close will save the settings and close the programmer, while Close Without Saving will just close the programmer.
Programming
Snapshot
Programming a snapshot is simple. Select the Cue Type, Snapshot. Set the fade time (in milliseconds). Make sure your DMX In and Out are connected. Set the lights to be what you want using a console or DMXCat, select program next to the preset you wish to record onto, press Save Changes. The button will blink. Press the button to record. Be aware that Rosalind will not output if it sees DMX values on the input, so you should unplug to test the preset.
Solid
Select the Cue Type Solid. Set the fade time (in milliseconds). Be sure you have set up the Cue Settings (Number of Fixtures, Channel Count) as well as DMX In and Out. Set one light to the color, select program next to the preset you wish to record onto, press Save Changes. The button will blink. Press the button to record. Be aware that Rosalind will not output if it sees DMX values on the input, so you should unplug to test the preset. The color will be played back on all lights.
Stripes
Select the Cue Type Stripes. Set the fade time (in milliseconds). Be sure you have set up the Cue Settings (Number of Fixtures, Channel Count) as well as DMX In and Out. Set Color Count to the number of colors you want. Set one light for each color (example-3 colors, 3 lights with one set to Cyan, one set to Magenta and the last set to Yellow). Select program next to the preset you wish to record onto, press Save Changes. The button will blink. Press the button to record. Be aware that Rosalind will not output if it sees DMX values on the input, so you should unplug to test the preset. The colors will be played back on all lights.
Bars
Select the Cue Type Bars. Set the fade time (in milliseconds). Be sure you have set up the Cue Settings (Number of Fixtures, Channel Count) as well as DMX In and Out. Set Color Count to the number of colors you want. Set one light for each color (example-3 colors, 3 lights with one set to Cyan, one set to Magenta and the last set to Yellow). Select program next to the preset you wish to record onto, press Save Changes. The button will blink. Press the button to record. Be aware that Rosalind will not output if it sees DMX values on the input, so you should unplug to test the preset. The colors will be played back on all lights.
Waves
Select the Cue Type Waves. Set the fade time (in milliseconds). Be sure you have set up the Cue Settings (Number of Fixtures, Channel Count) as well as DMX In and Out. Set Color Count to the number of colors you want. Set one light for each color (example-3 colors, 3 lights with one set to Cyan, one set to Magenta and the last set to Yellow). Next set Rate to be the number of fixtures you wish the effect to play across at once. Select 10, as example. Select program next to the preset you wish to record onto, press Save Changes. The button will blink. Press the button to record. Be aware that Rosalind will not output if it sees DMX values on the input, so you should unplug to test the preset. The colors will be played back on all lights.
Roll
Select the Cue Type Roll. Set the fade time (in milliseconds). Be sure you have set up the Cue Settings (Number of Fixtures, Channel Count) as well as DMX In and Out. Set Color Count to the number of colors you want. Set one light for each color (example-3 colors, 3 lights with one set to Cyan, one set to Magenta and the last set to Yellow). Select program next to the preset you wish to record onto, press Save Changes. The button will blink. Press the button to record. Be aware that Rosalind will not output if it sees DMX values on the input, so you should unplug to test the preset. The colors will be played back on all lights.
Record Mode Notes
Once a button is in record mode, it will stay in record mode until you change pages, the device resets, or the cue is recorded. You can put all 8 buttons into record mode and record them one at a time— setting parameters and recording colors/snapshots are separate phases.
It’s also notable that you can change cue modes without having to reprogram— if you record 6 colors into a button and then change that to 4 colors, it’s fine. You can switch between modes and change parameters, etc, without having to re-record the colors.
Additionally, if you just want to see what colors are in a button, you can change the button to a Snapshot cue and it’ll display the recorded fixtures.
Preview Data
The Preview Data button allows you to see what is programmed into each button as well as the states of various internal buffers. When you click on this button, it will load the data from Page 1 Button 1:
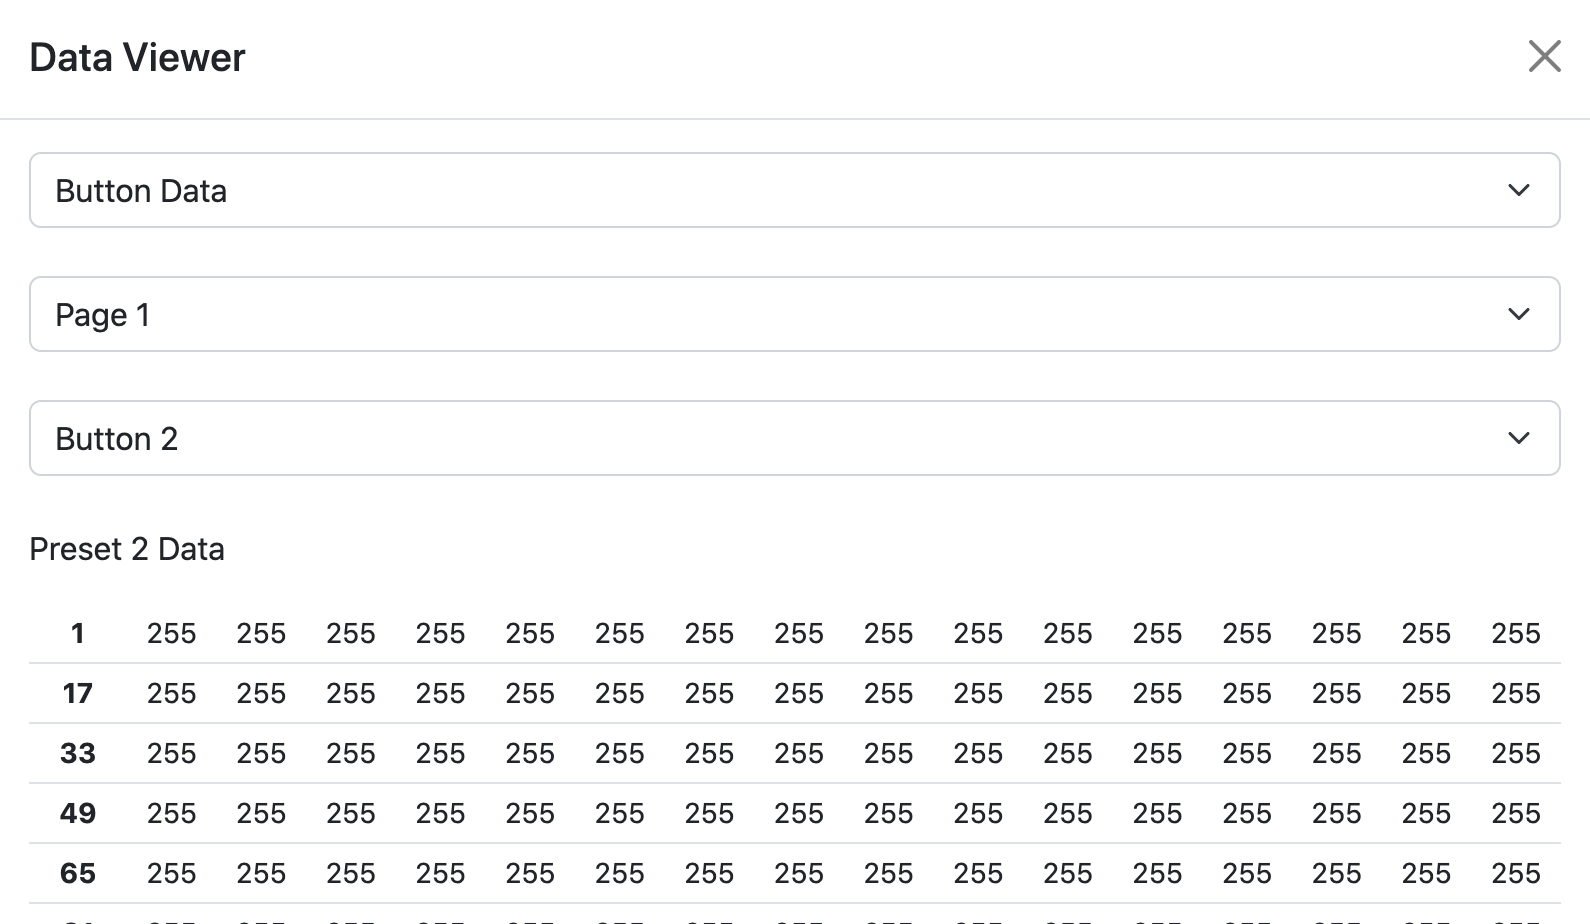
If you change what data are displayed, you need to press the Load button at the bottom of the pop-up.
6 options for type of data to display are available:
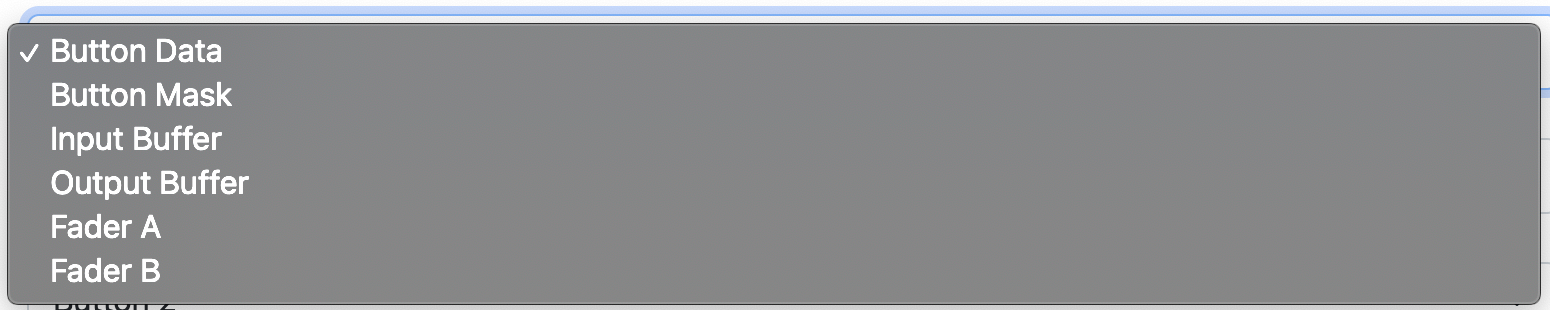
Button Data: this is the data stored for each preset
Button Mask: additional metadata stored for each preset, used for troubleshooting.
Input Buffer: The current DMX Input buffer, populated from either DMX or sACN
Output Buffer: The current DMX Output buffer
Fader A & Fader B: Internal buffers used for troubleshooting
Launch Button Station
Pressing the Launch Button Station pops up a window with a web-based version of the button station. This can be useful for testing button behavior if you are not able to be directly next to the button station during programming.
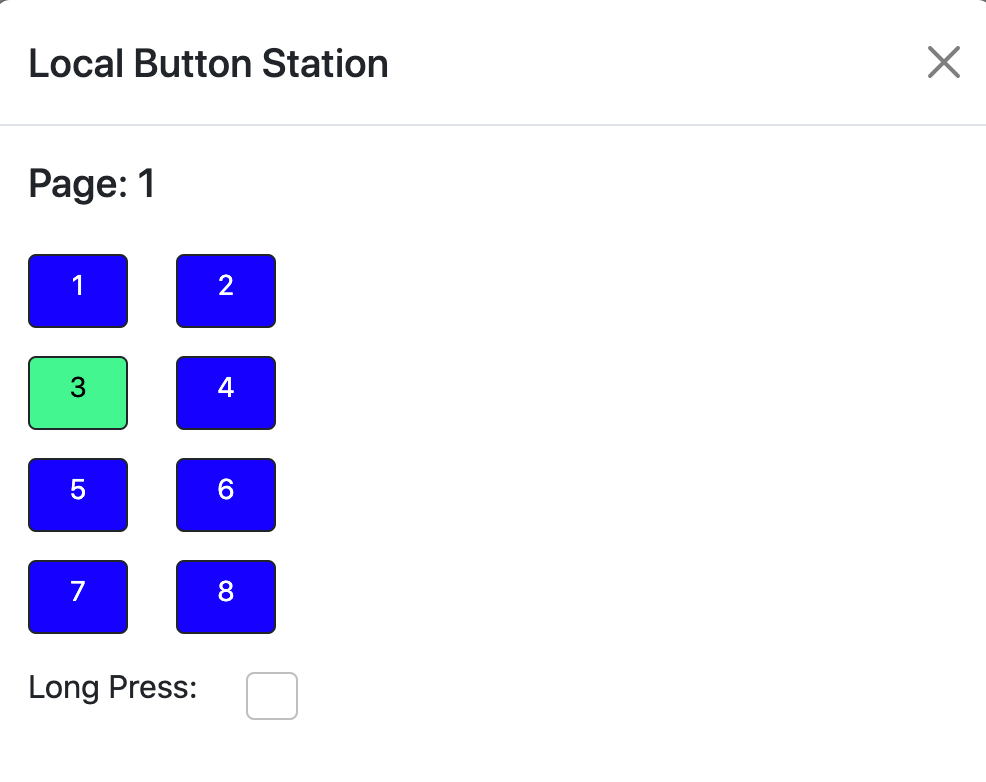
Checking the Long Press box and then pressing buttons is equivalent to long pressing the buttons.
Preset Control Page
The button station features a page for easy recall of presets, suitable for integrating into other parts of the control system or touchscreens. After you have saved some presets with labels, go to the URL http://10.1.0.20/prepage — replacing the IP address with the address of your button station.
This will launch a page like this:

Any preset that is named that does not start with an underscore is included in the list of presets:
Unnamed presets are not included.
Clicking on a preset on the preset page will launch that preset. If the button station is set to the page that preset is on, the button LED will switch to the active state.